Jupyter notebook formally called ipython, is a web application that runs code in the browser with addition of comments, visualizations, paragraph, equations, title, links, figures, and LaTex by using the markdown language which is very useful while writing code that requires explanation.
The good thing with Jupyter it is the fact that you can easily integrate and import different machine learning packages like pandas, numpy, scipy and matplotlib and many more through anaconda distribution making it the best swiss army knife for data science research. This is the reason why Jupyter has become the most indispensable tool for anyone doing machine learning, and did I forgot to mention? It is 100% FREE!!
These are the top 10 reasons data scientist use jupyter notebook
-
All in one place: The Jupyter Notebook is a web-based interactive environment that combines code, rich text, images, videos, animations, mathematical equations, plots, maps, interactive figures and widgets, and graphical user interfaces, into a single document.
-
Easy to share: Notebooks are saved as structured text files (JSON format), which makes them easily shareable.
-
Easy to convert: Jupyter comes with a special tool, nbconvert, which converts notebooks to other formats such as HTML and PDF. Another online tool, nbviewer, allows us to render a publicly-available notebook directly in the browser.
-
Language independent: The architecture of Jupyter is language independent. The decoupling between the client and kernel makes it possible to write kernels in any language.
-
Easy to create kernel wrappers: Jupyter brings a lightweight interface for kernel languages that can be wrapped in Python. Wrapper kernels can implement optional methods, notably for code completion and code inspection.
-
Easy to customize: Jupyter interface can be used to create an entirely customized experience in the Jupyter Notebook (or another client application such as the console).
-
Extensions with custom magic commands: Create IPython extensions with custom magic commands to make interactive computing even more straightforward. Many third-party extensions and magic commands exist, for example, the %%cython magic that allows one to write Cython code directly in a notebook.
-
Stress-free Reproducible experiments: Jupyter notebooks can help you conduct efficient and reproducible interactive computing experiments with ease. It lets you keep a detailed record of your work. Also, the ease of use of the Jupyter Notebook means that you don’t have to worry about reproducibility; do all of your interactive work in notebooks, put them under version control, and commit regularly. Don’t forget to refactor your code into independent, reusable components.
-
Effective teaching-cum-learning tool: The Jupyter Notebook is not only a tool for scientific research and data analysis but also an excellent tool for teaching. An example is IPython Blocks – a library that allows you or your students to create grids of colorful blocks.
-
Interactive code and data exploration: The ipywidgets package provides many common user-interface controls for exploring code and data interactively.
source: Packt
Installation
Jupyter comes bundled in Anaconda navigator, so logically you will need first to download Anaconda here. A quick mention, you will be asked to download between python 2 or python 3, and as I have already said in my other post I will be using python 3 on this blog, so I suggest to download Python 3 as well.
After the downloading and installing the anaconda executable file, you check if anaconda is correctly installed by using the following command.
conda info
and this shall display
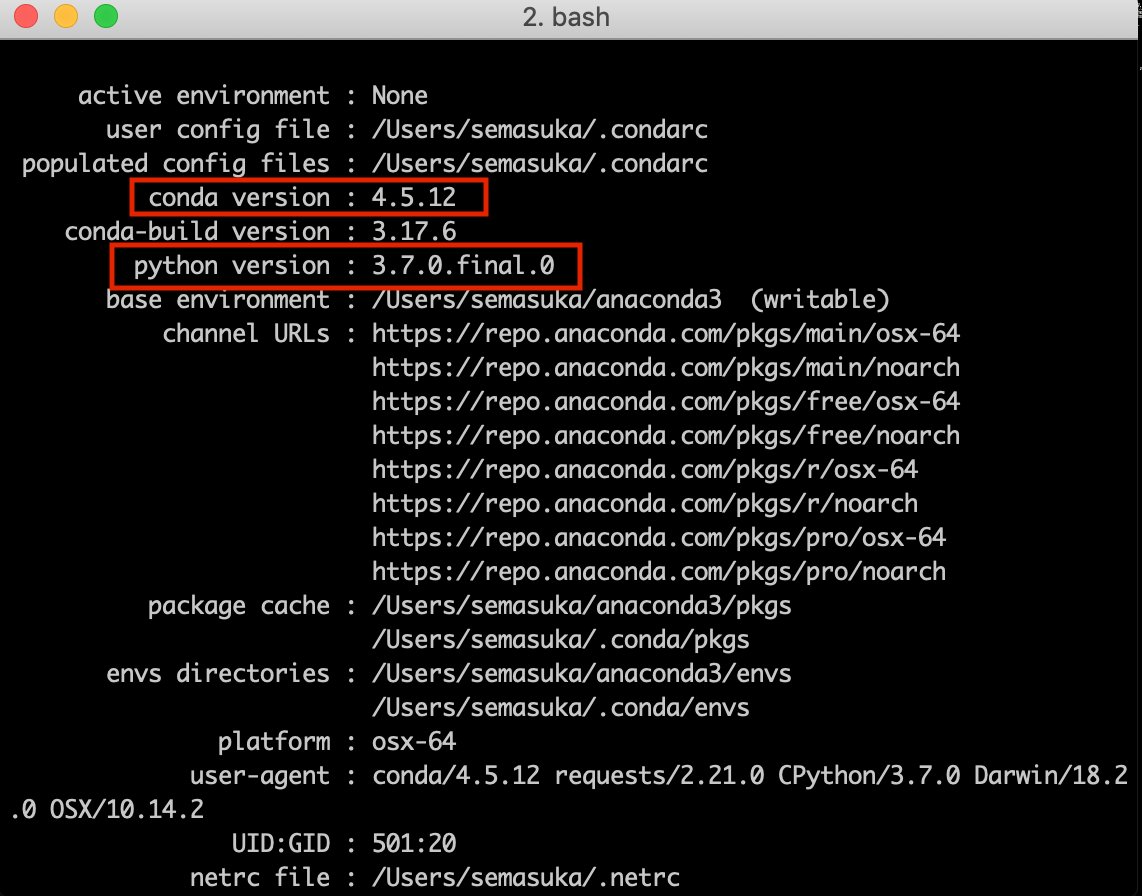
We can see the version of python and anaconda installed.
Installation of Machine Learning packages
Packages or libraries in programming is a bunch of codes written by someone else that we add and use into our code. Some popular libraries for ML are: numpy for scientific computation, pandas for data extraction and preparation, scipy for modules optimization, Matplotlib and Seaborn for data visualization, Scikit-learn is the most popular ML libraries. It supports many supervised and unsupervised learning algorithms and finally TensorFlow, PyTorch, and Keras used mostly for deep learning.
to install numpy run this command
conda install -c anaconda numpy
to install pandas run this command
conda install -c anaconda pandas
to install scipy run this command
conda install -c anaconda scipy
to install matplotlib run this command
conda install -c conda-forge matplotlib
to install seaborn run this command
conda install -c anaconda seaborn
to install scitkit-learn run this command
conda install -c anaconda scikit-learn
to install TensorFlow run this command
conda install -c conda-forge tensorflow
to install PyTorch run this command
conda install -c pytorch pytorch
to install Keras run this command
conda install -c conda-forge keras
Update the packages
To update all the packages install in Anaconda at once, run this command.
conda update --all
and to update python version in Anaconda, run this command
conda update python
Basics on the interface of Jupyter
Ok now that we all set, you can click on the anaconda shortcut, and you shall get a menu like this
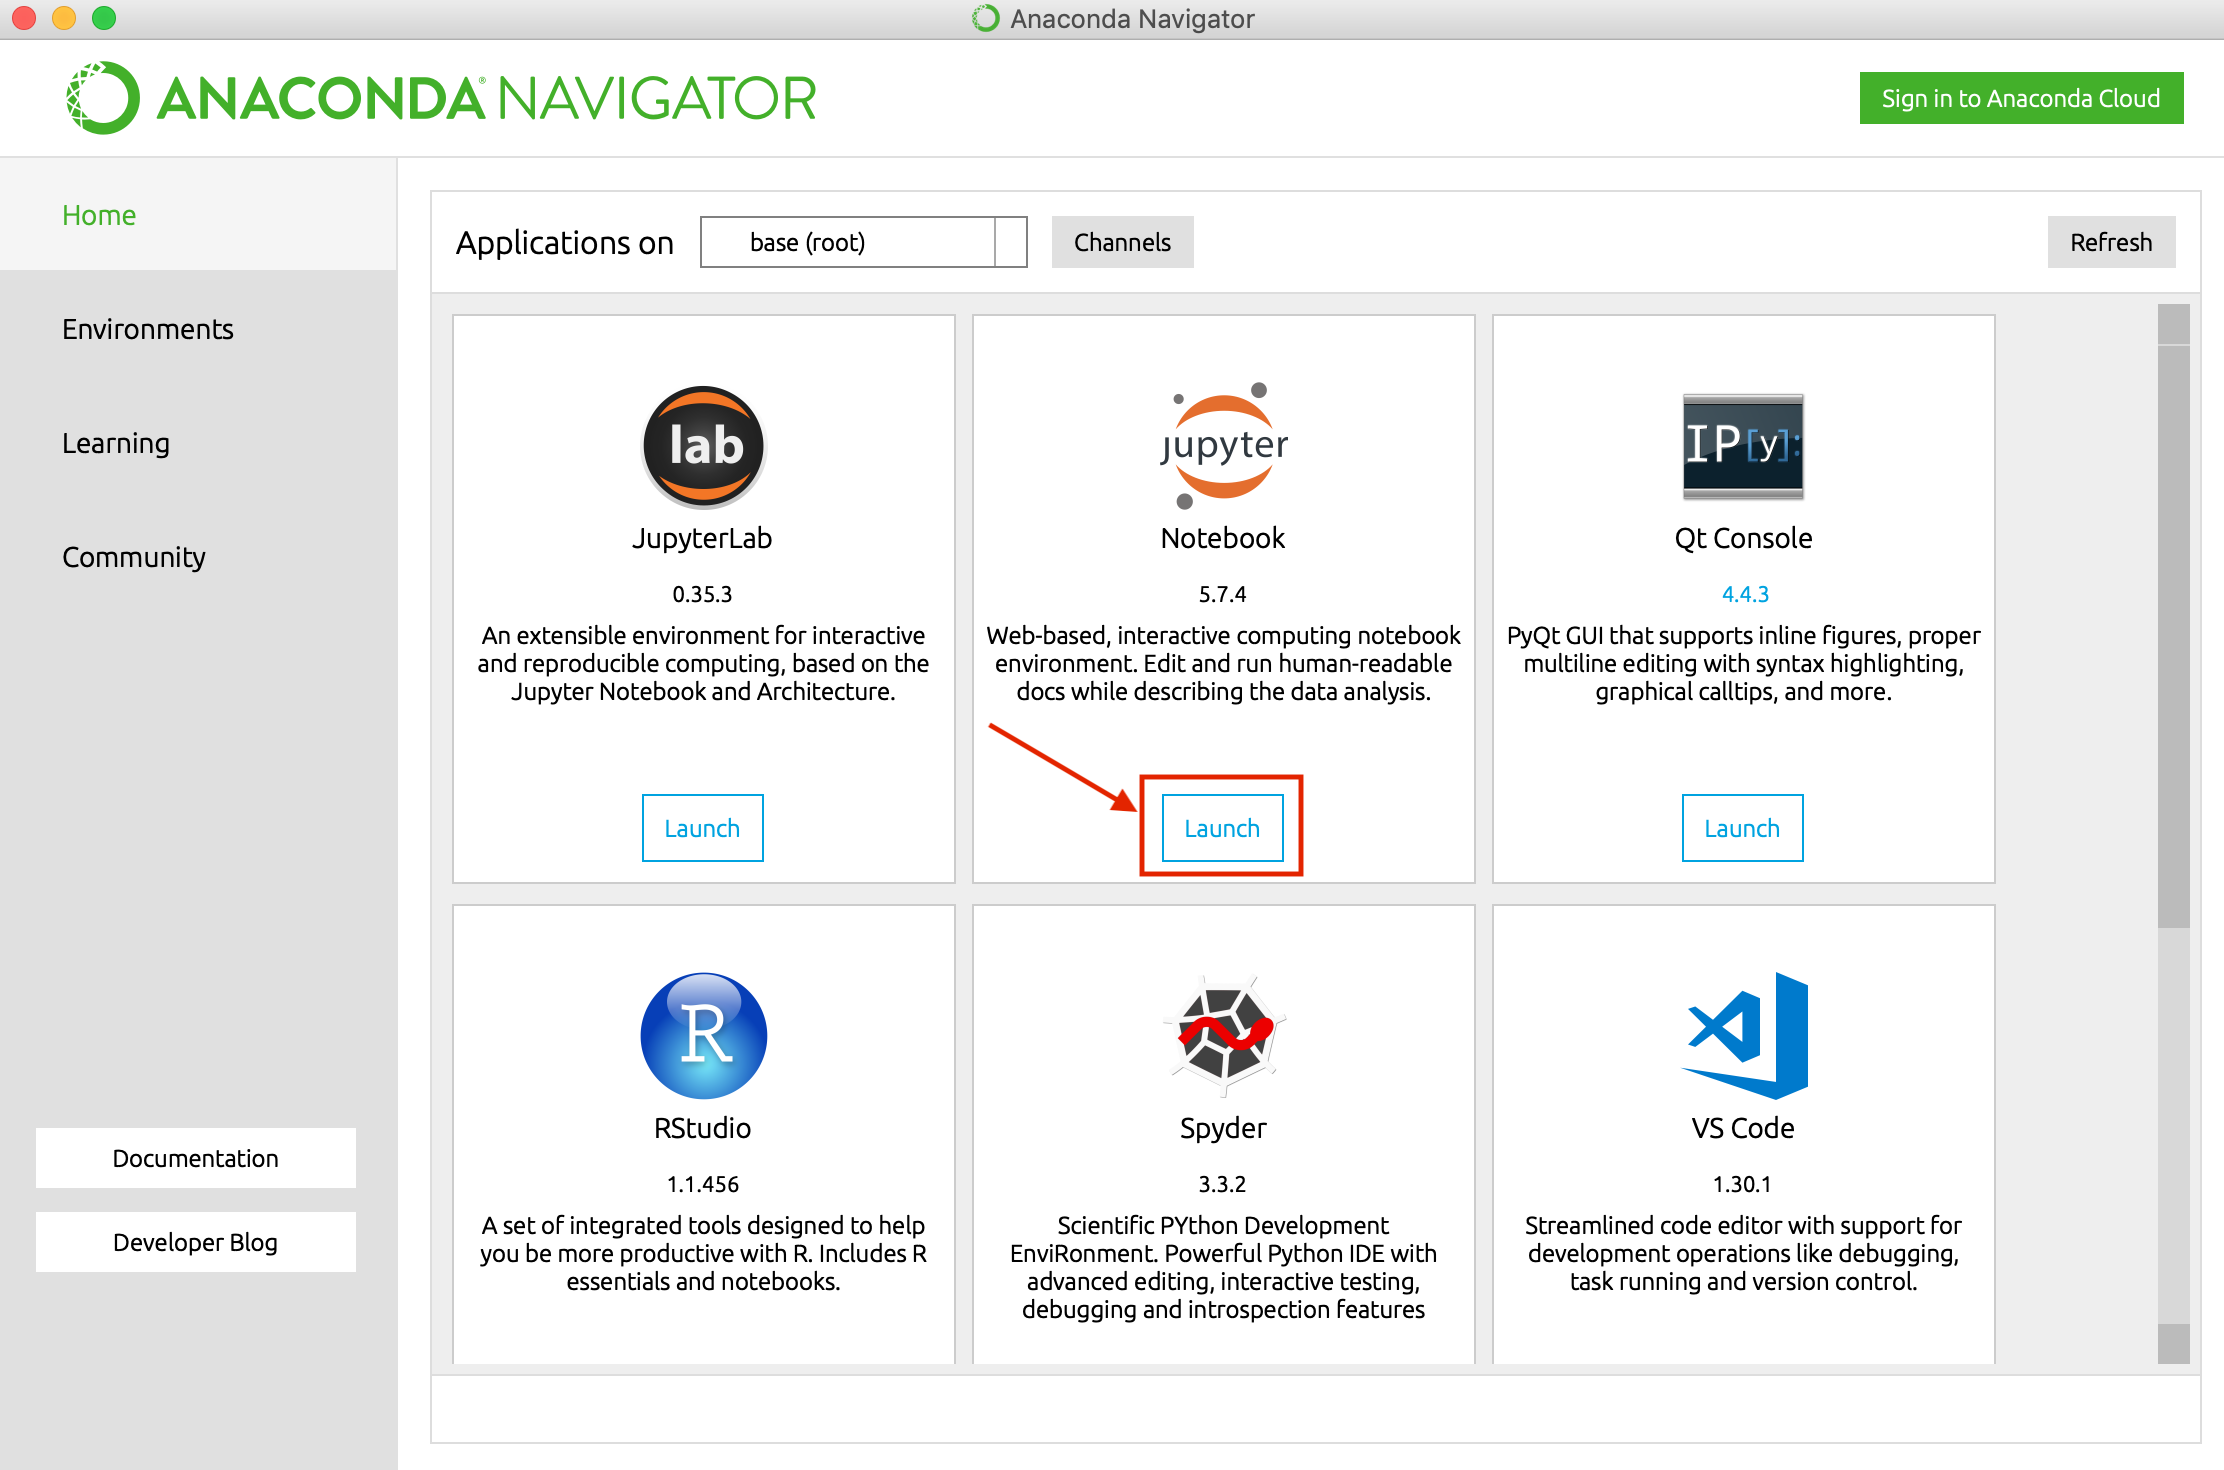
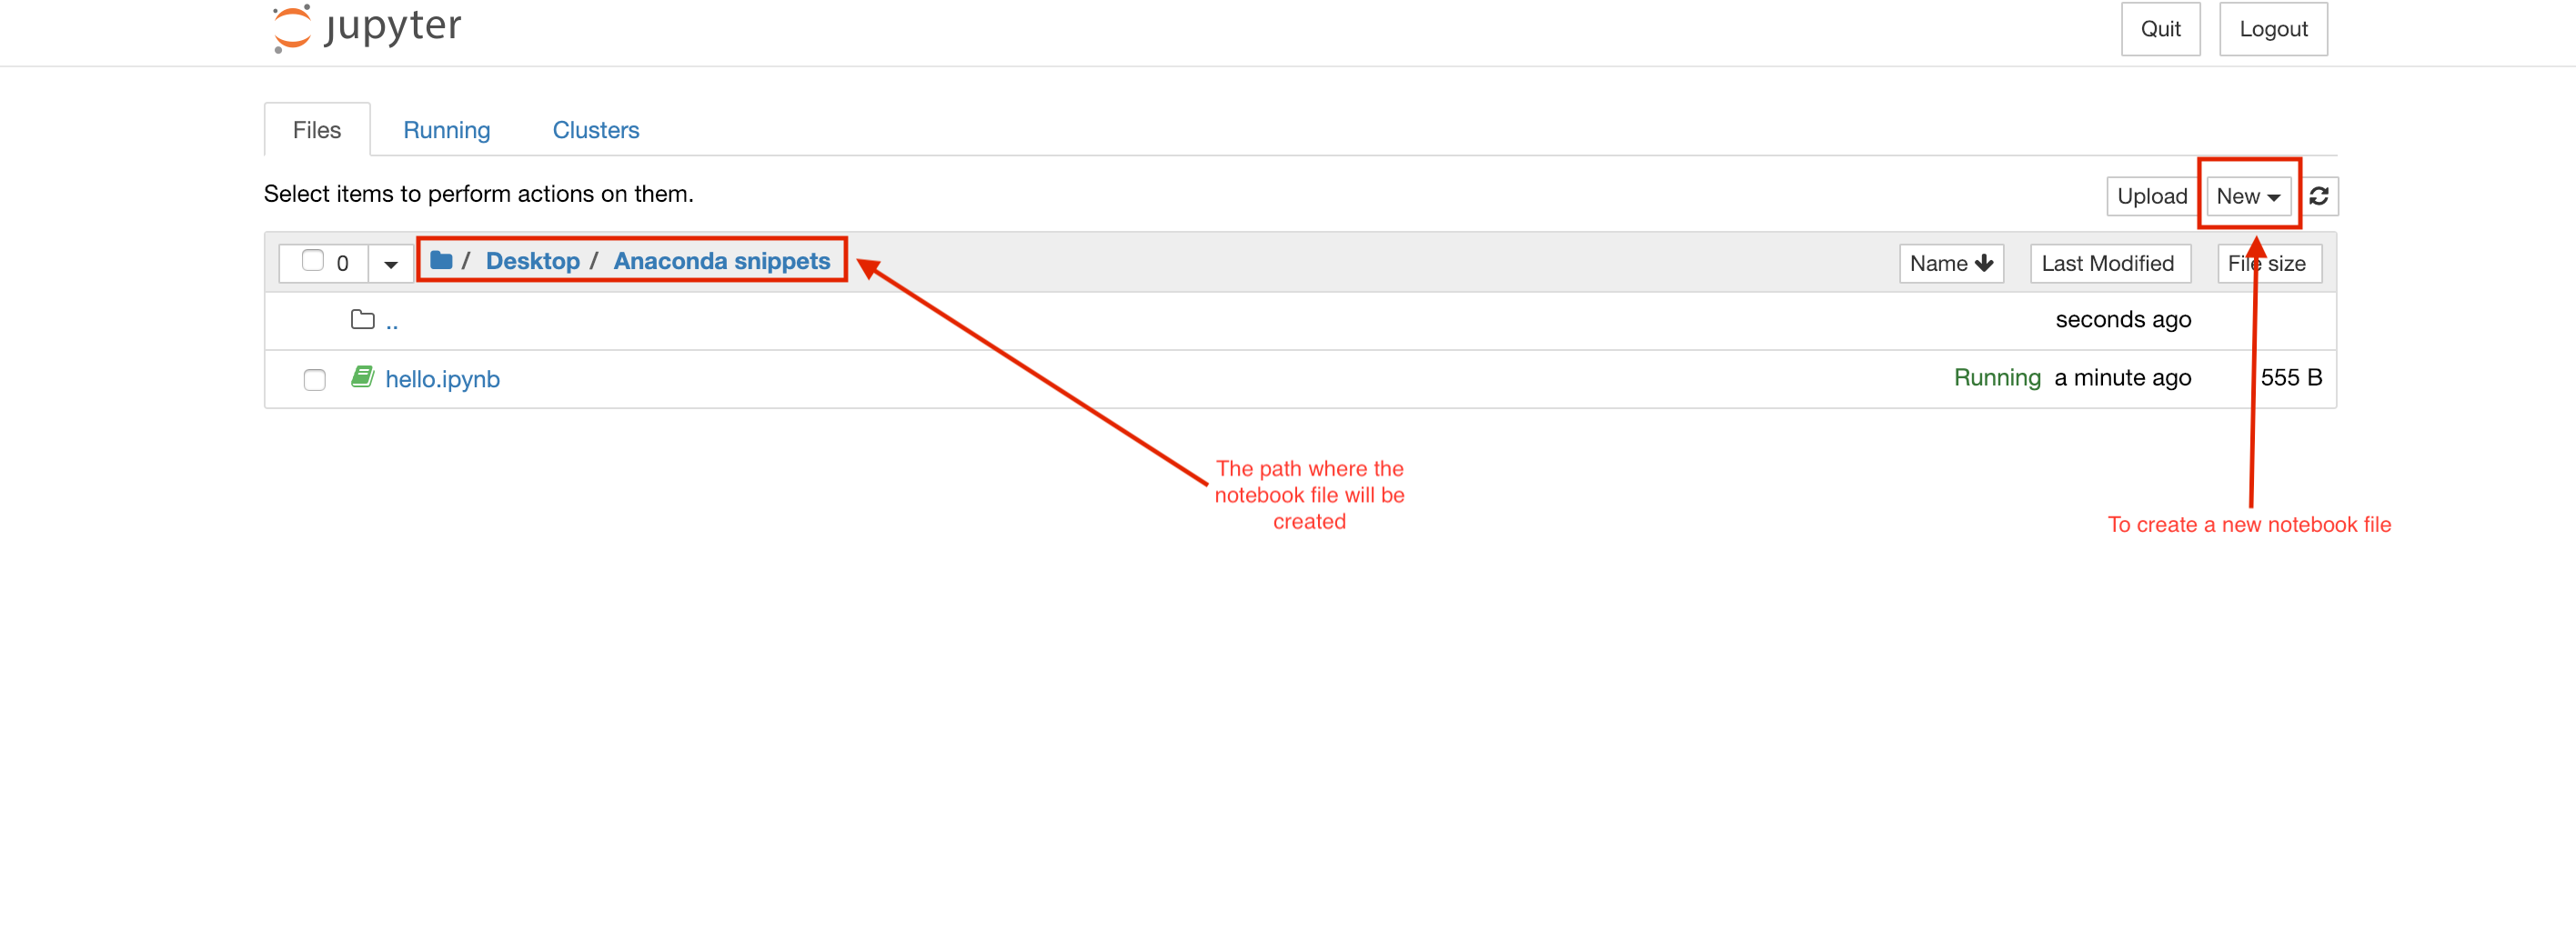
Now click on launch jupyter notebook, and it should open a new tab in your default browser window at localhost:8888. The path shows where will the .ipynb file (jupyter notebook extension file) will be saved on the disk. To create a new .ipynb file, you click on new at the right corner of the page and then click on python 3
The place where the code goes is called the cell, and you can run the code in the cell by pressing the run button or by using the shortcut SHIFT+ENTER. The output will be then displayed at the bottom of the cell.

If you press ENTER only, a new line will be created in the cell, but no output will be displayed.
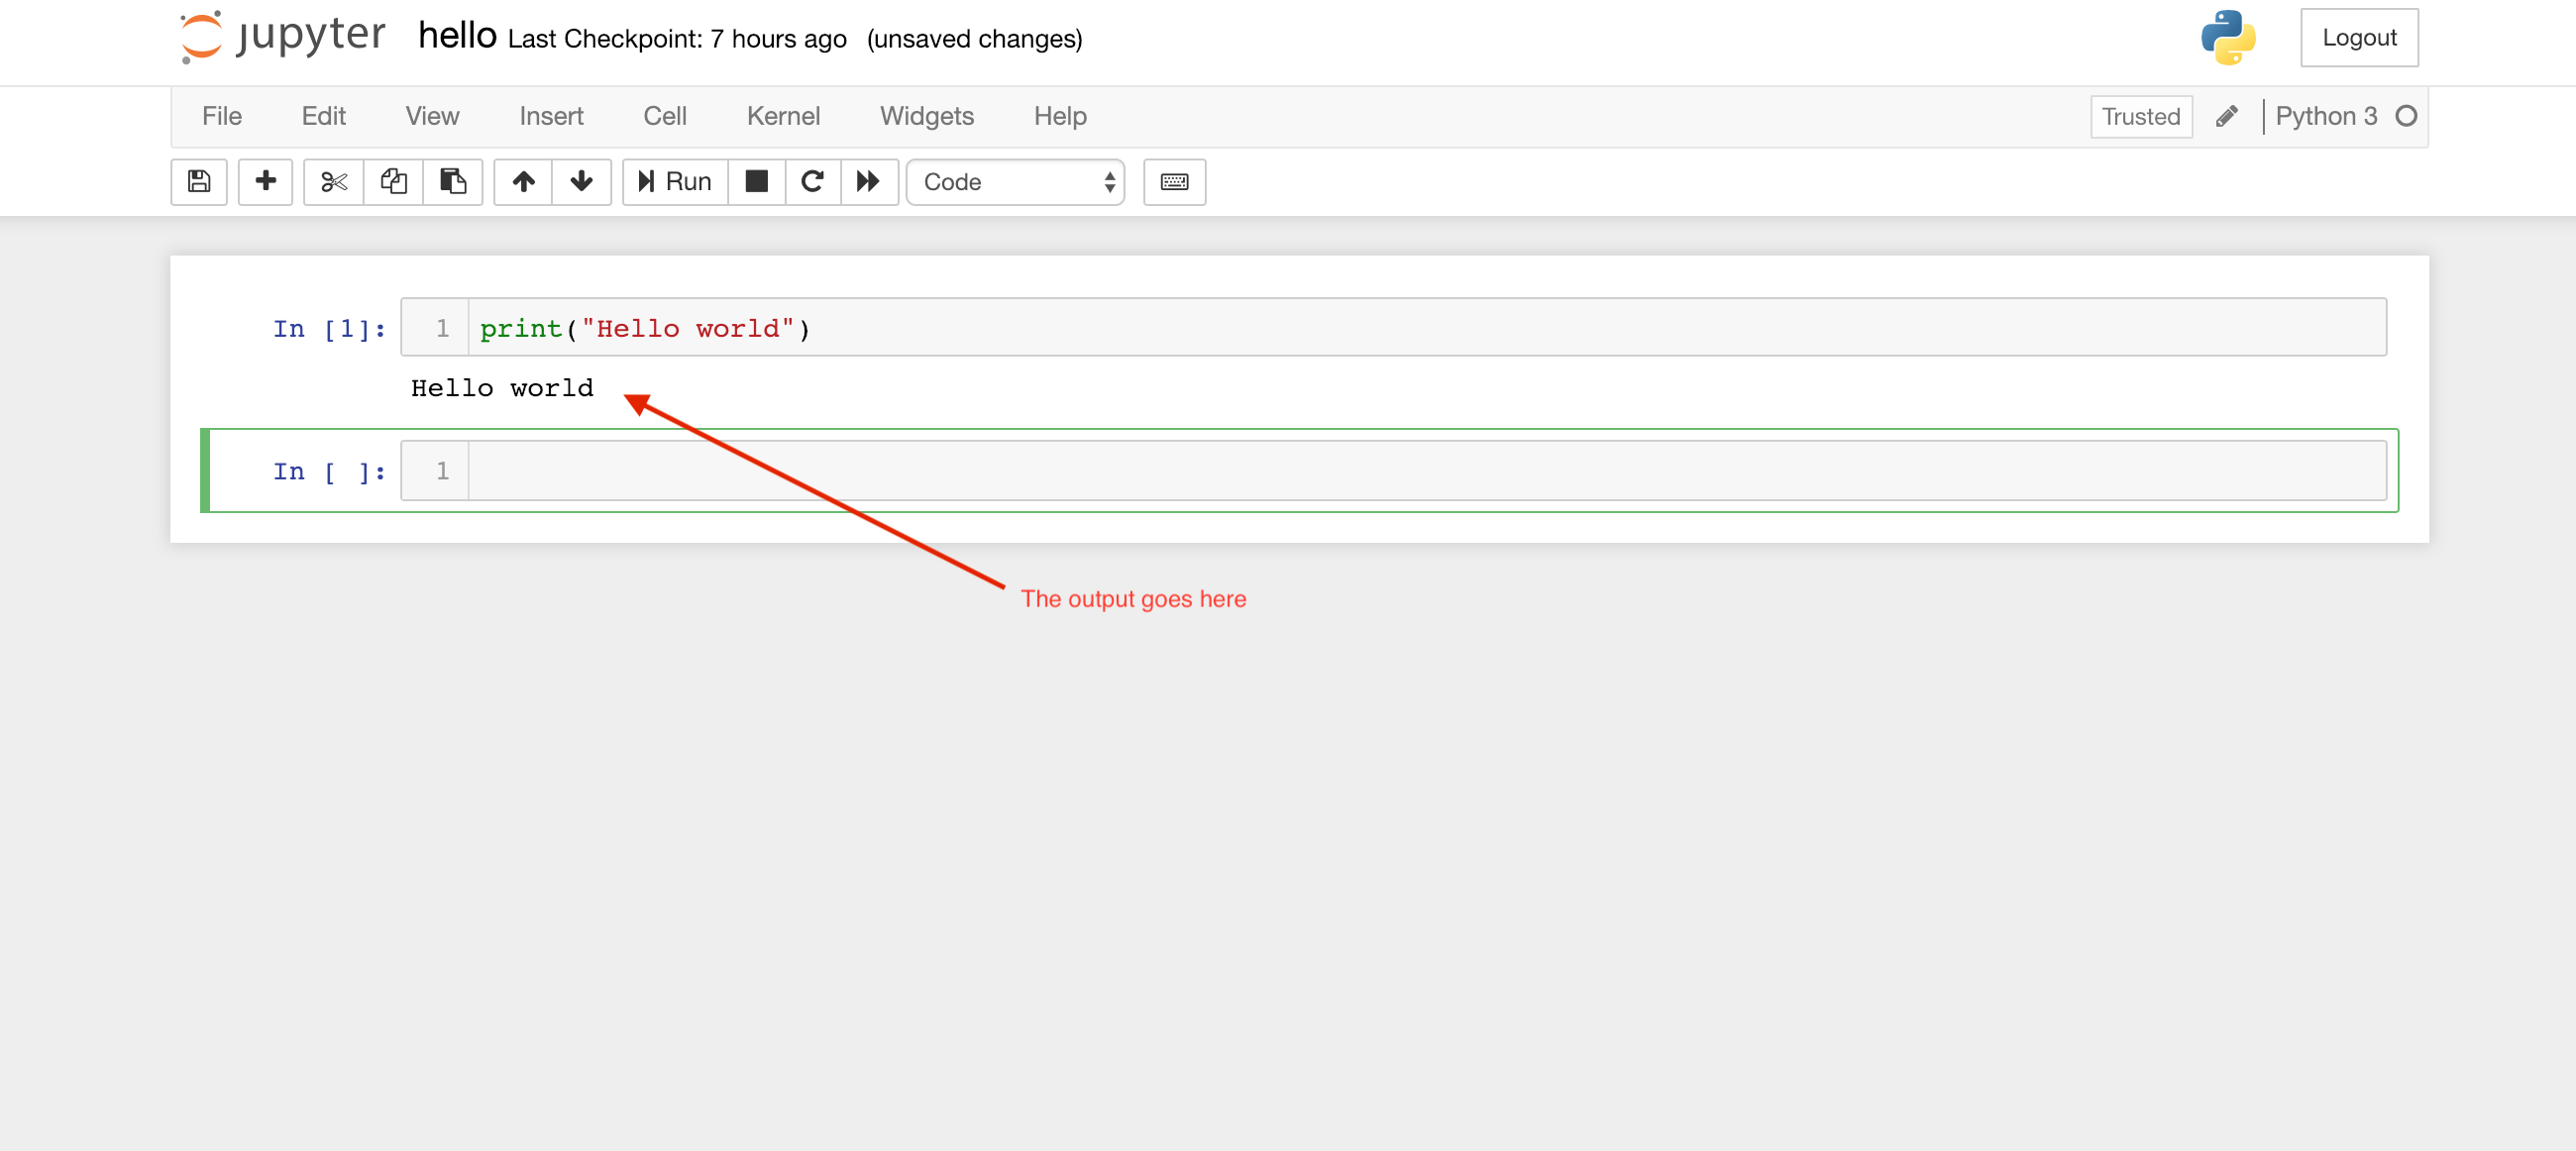
You can also use a variable(I will explain more on this in my next post) to store a value and retrieve it by running the cell. To change the name of the .ipynb file, you can click on the untitled file name and change it to whatever you want.

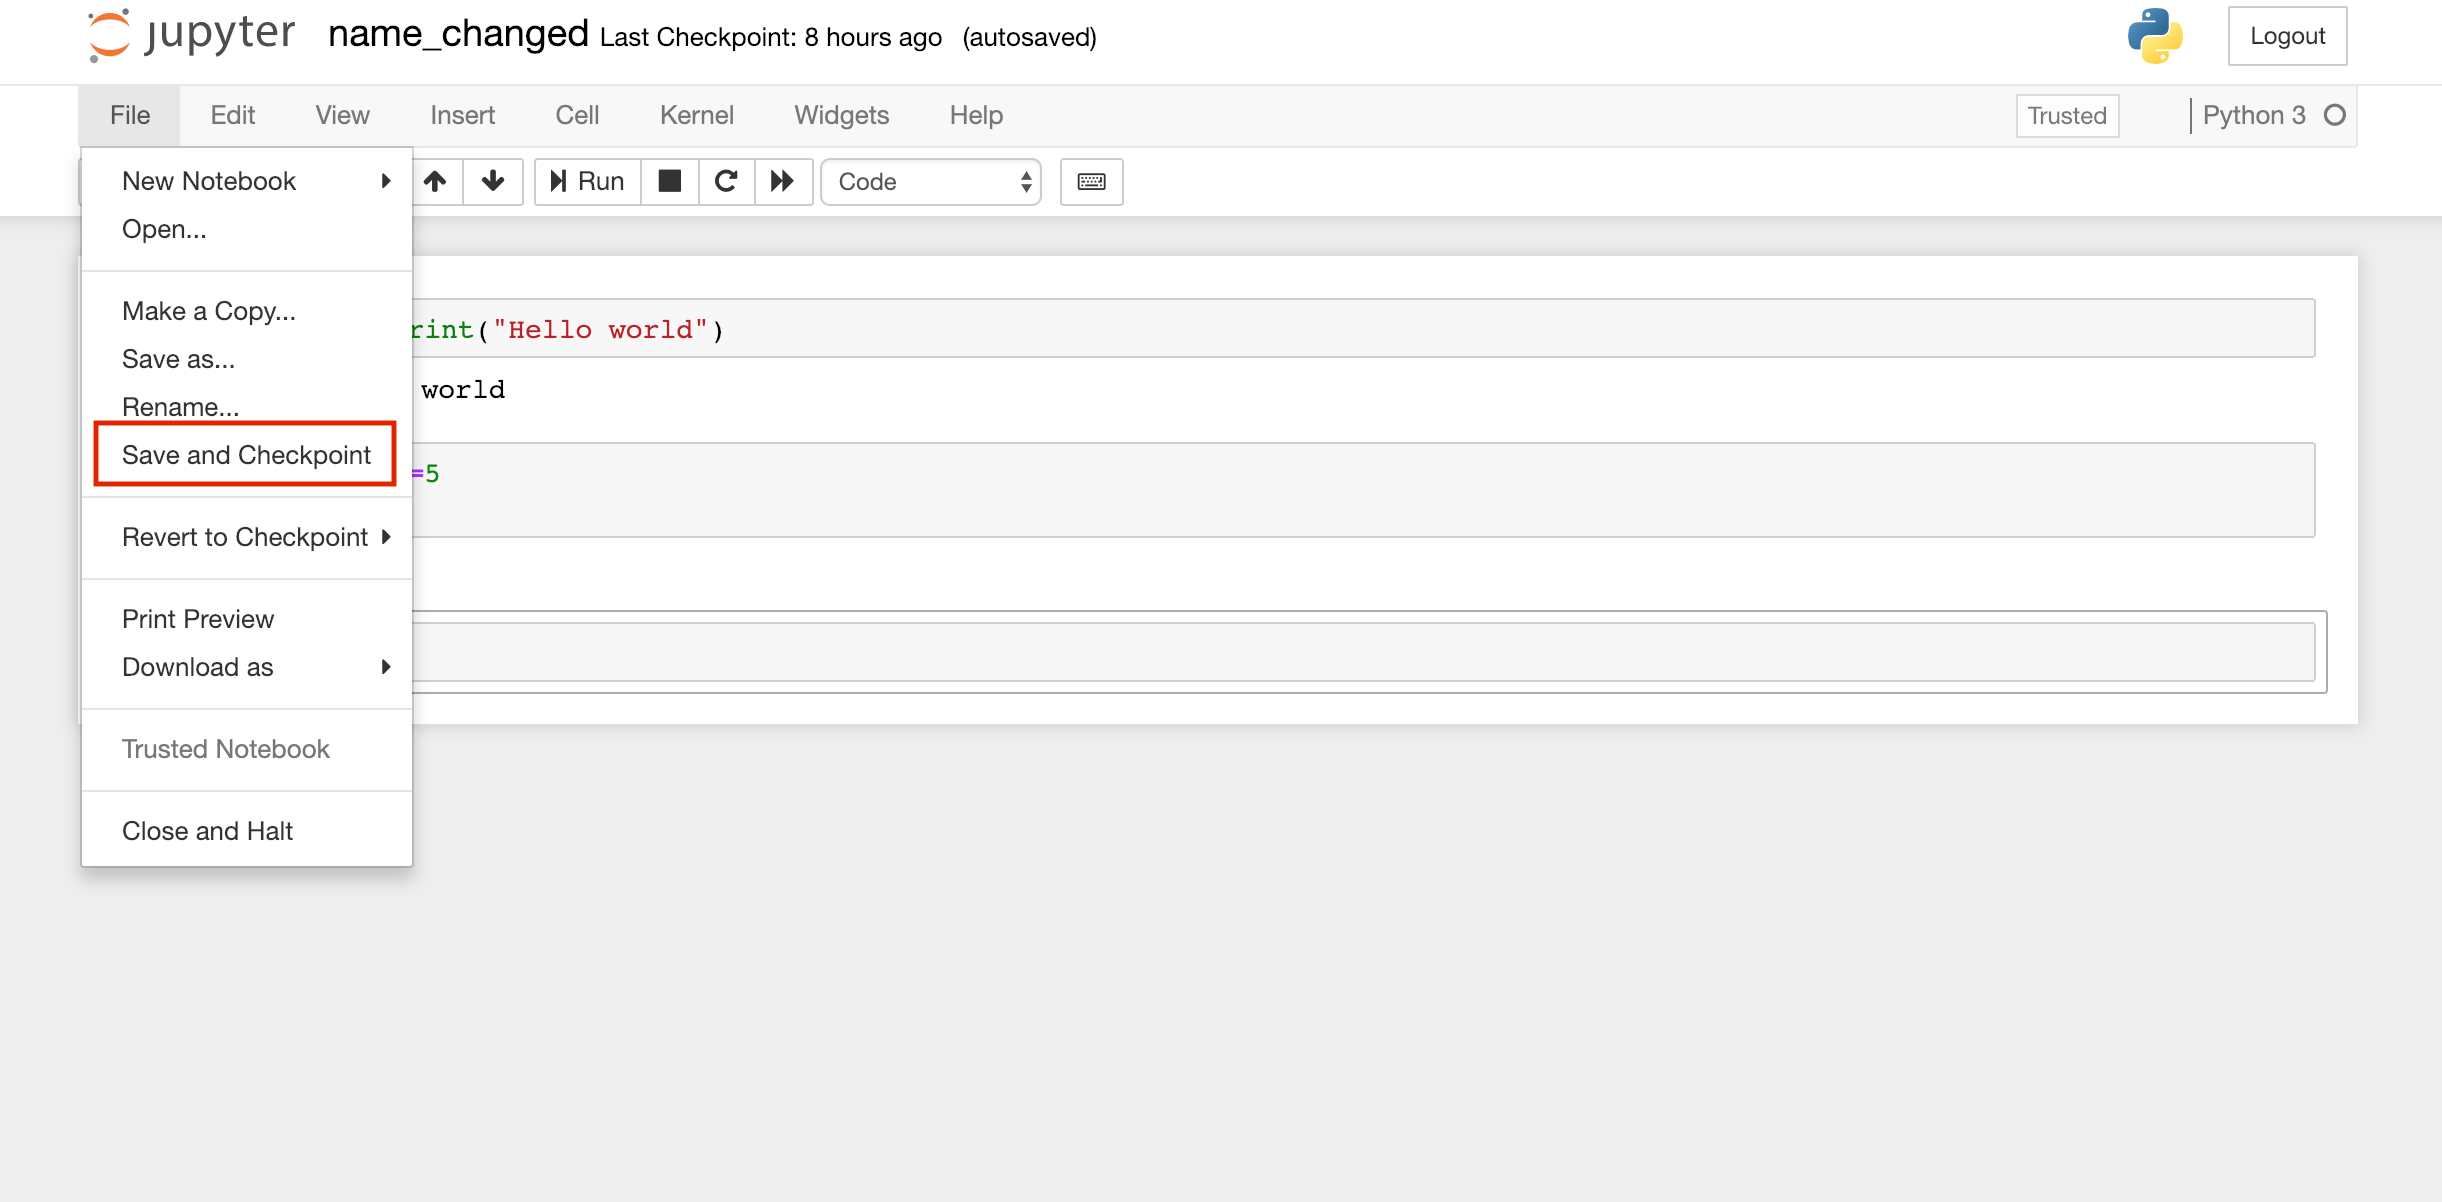
To save the .ipynb file, you click on the file in the menu bar and then Save and Checkpoint
Modes in Jupyter
We have two different modes in Jupyter notebook.
- Edit mode
- Command mode
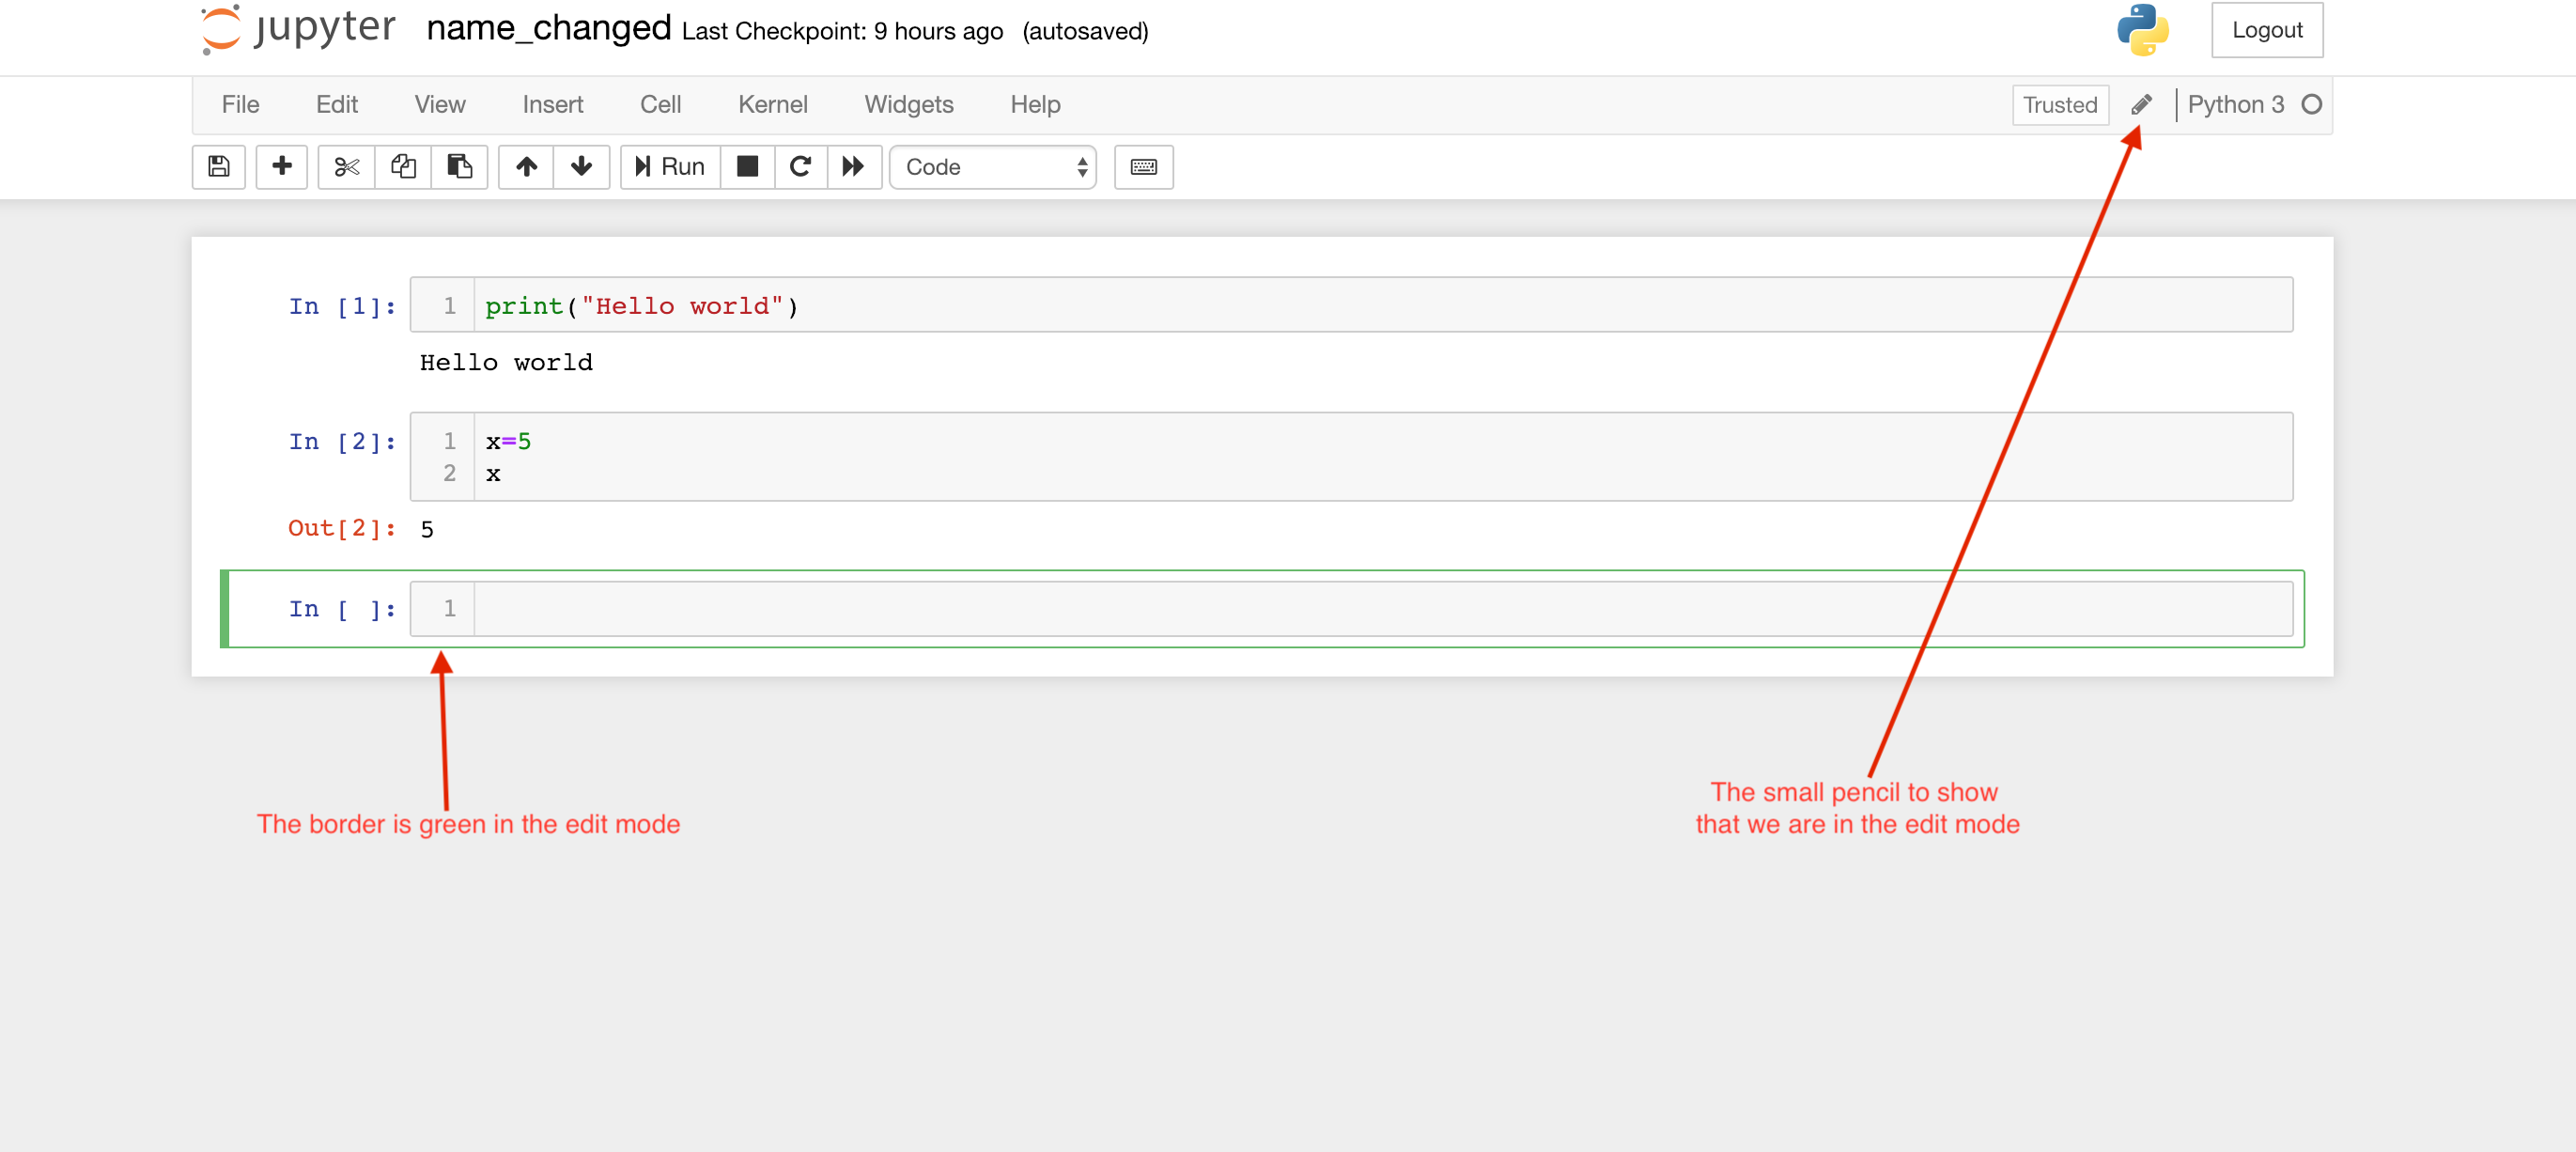
We can see that we are in the edit mode when the border’s cell turns green while a small pencil appears in the right corner of the page like shown in the picture below. In this mode, we are making changes to the cell only. The edit mode is activated by clicking simply in the cell or by hitting the ENTER key.
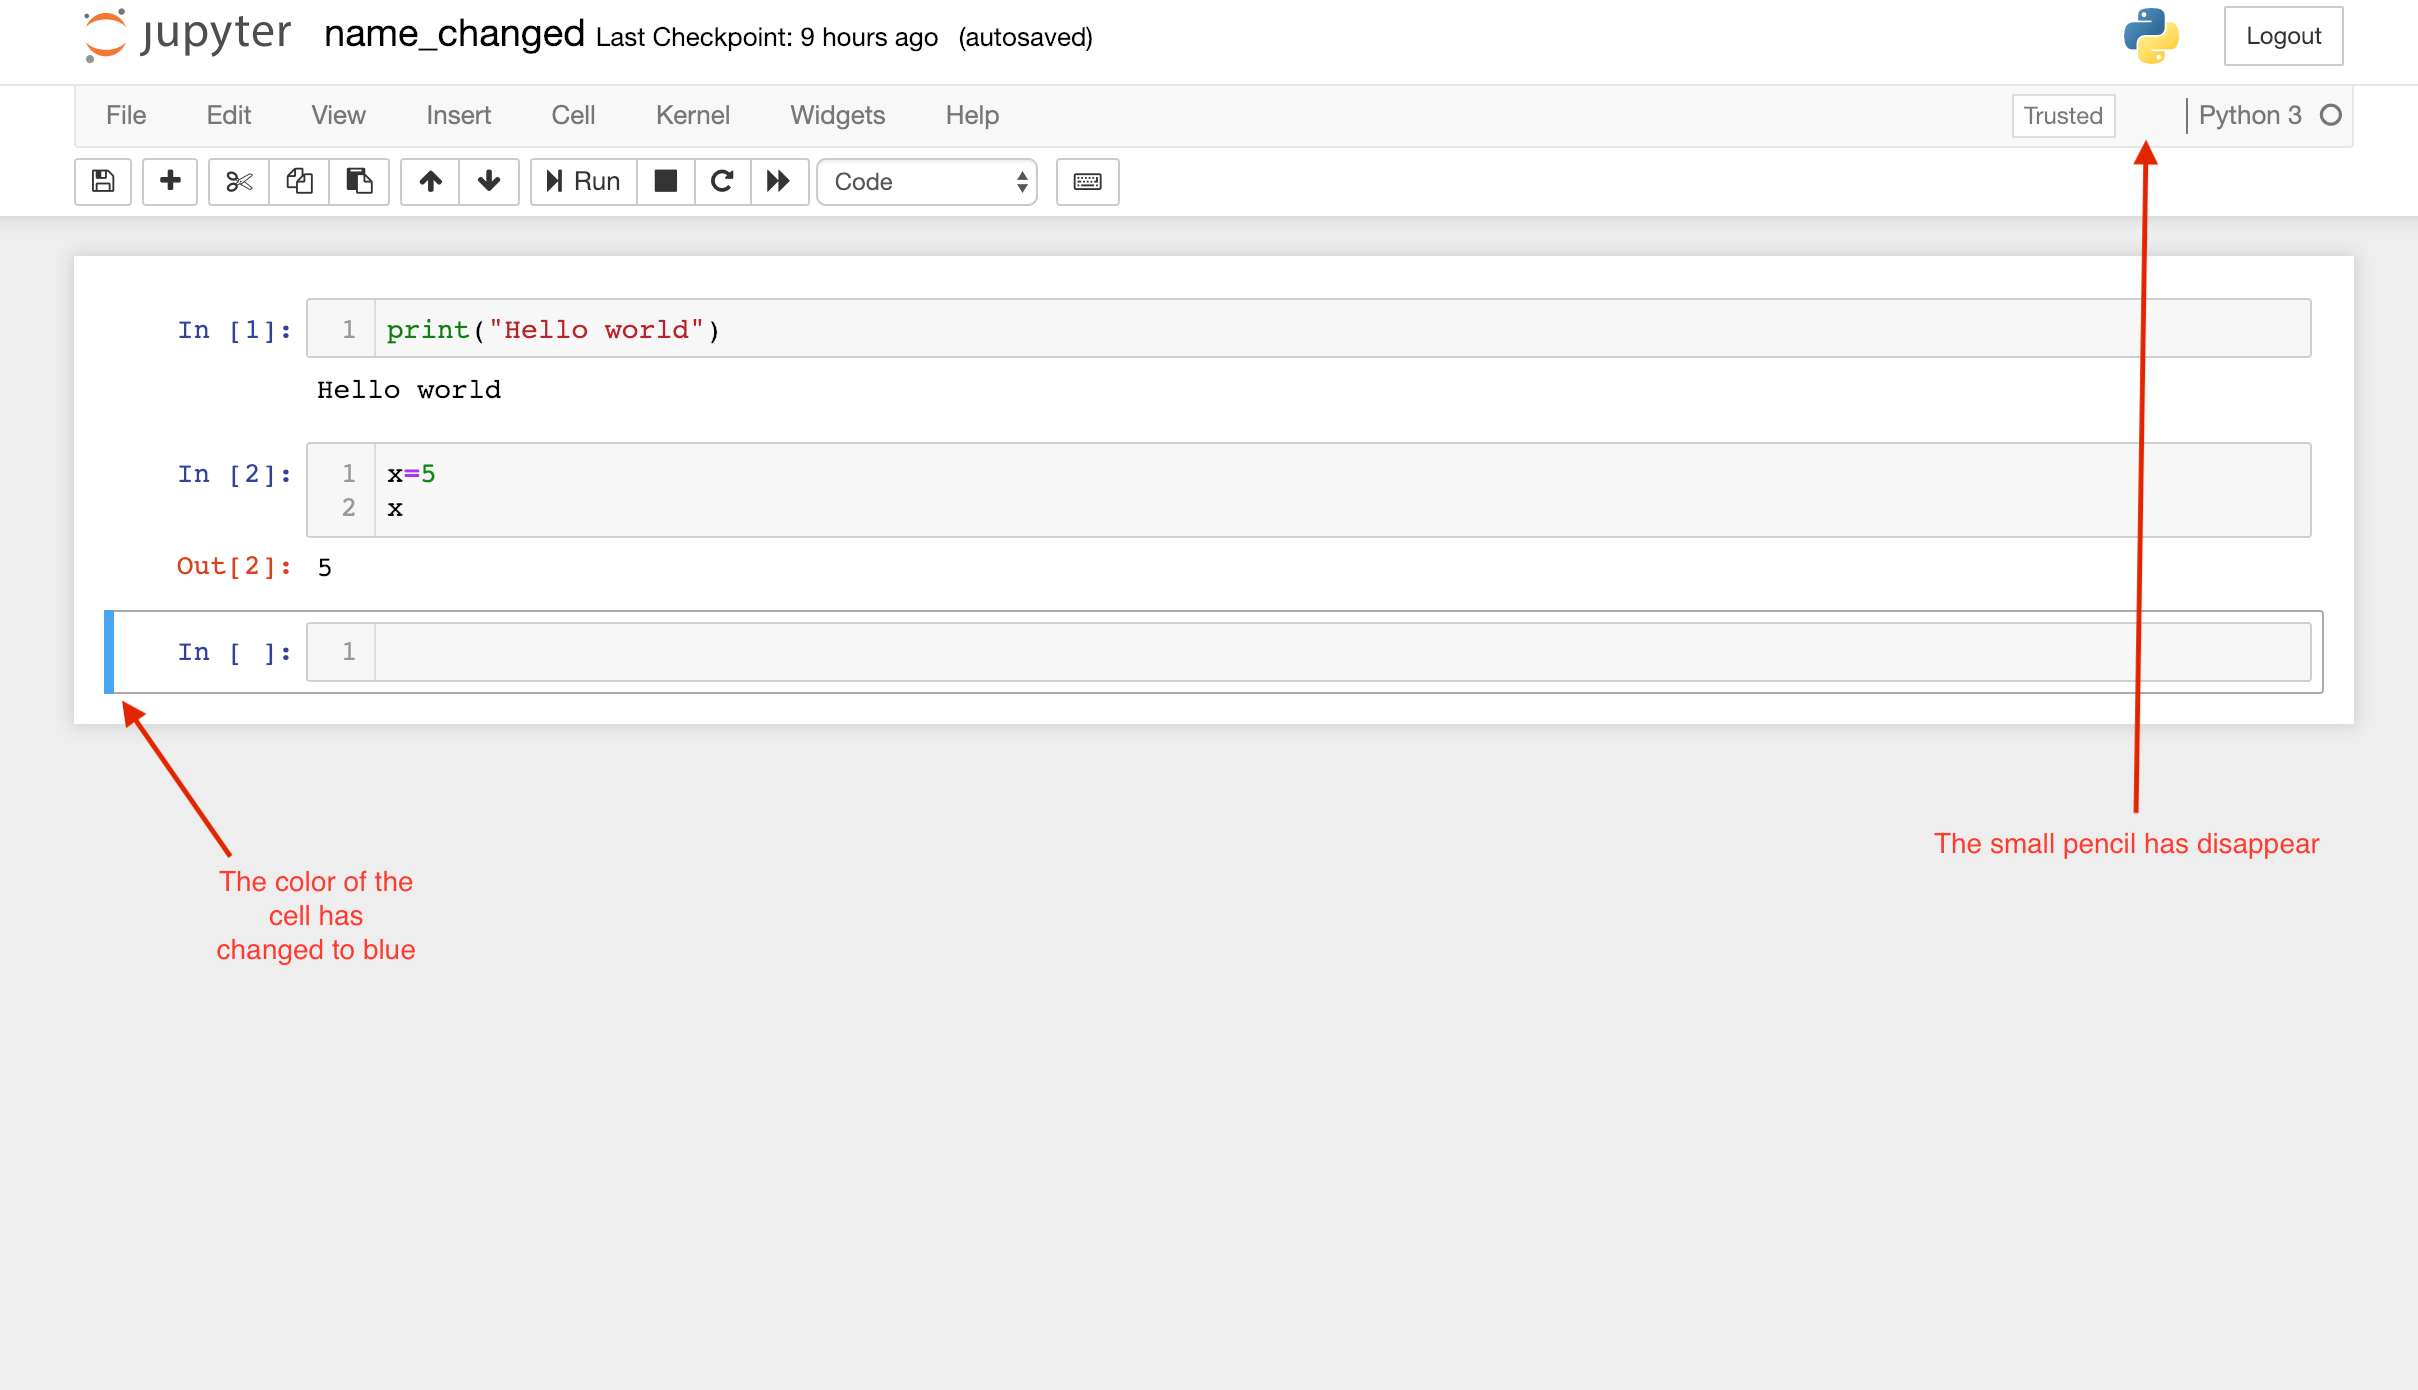
We also have the command mode, which means that you can navigate around the notebook using keyboard shortcuts, helpful when adding or deleting cells. The command mode can be activated by pressing the ESC key. The color of the border cell changes to blue in this mode, and the small pencil disappears.
Toolbar icon
We are going to explore the purpose of each icon in the toolbar.
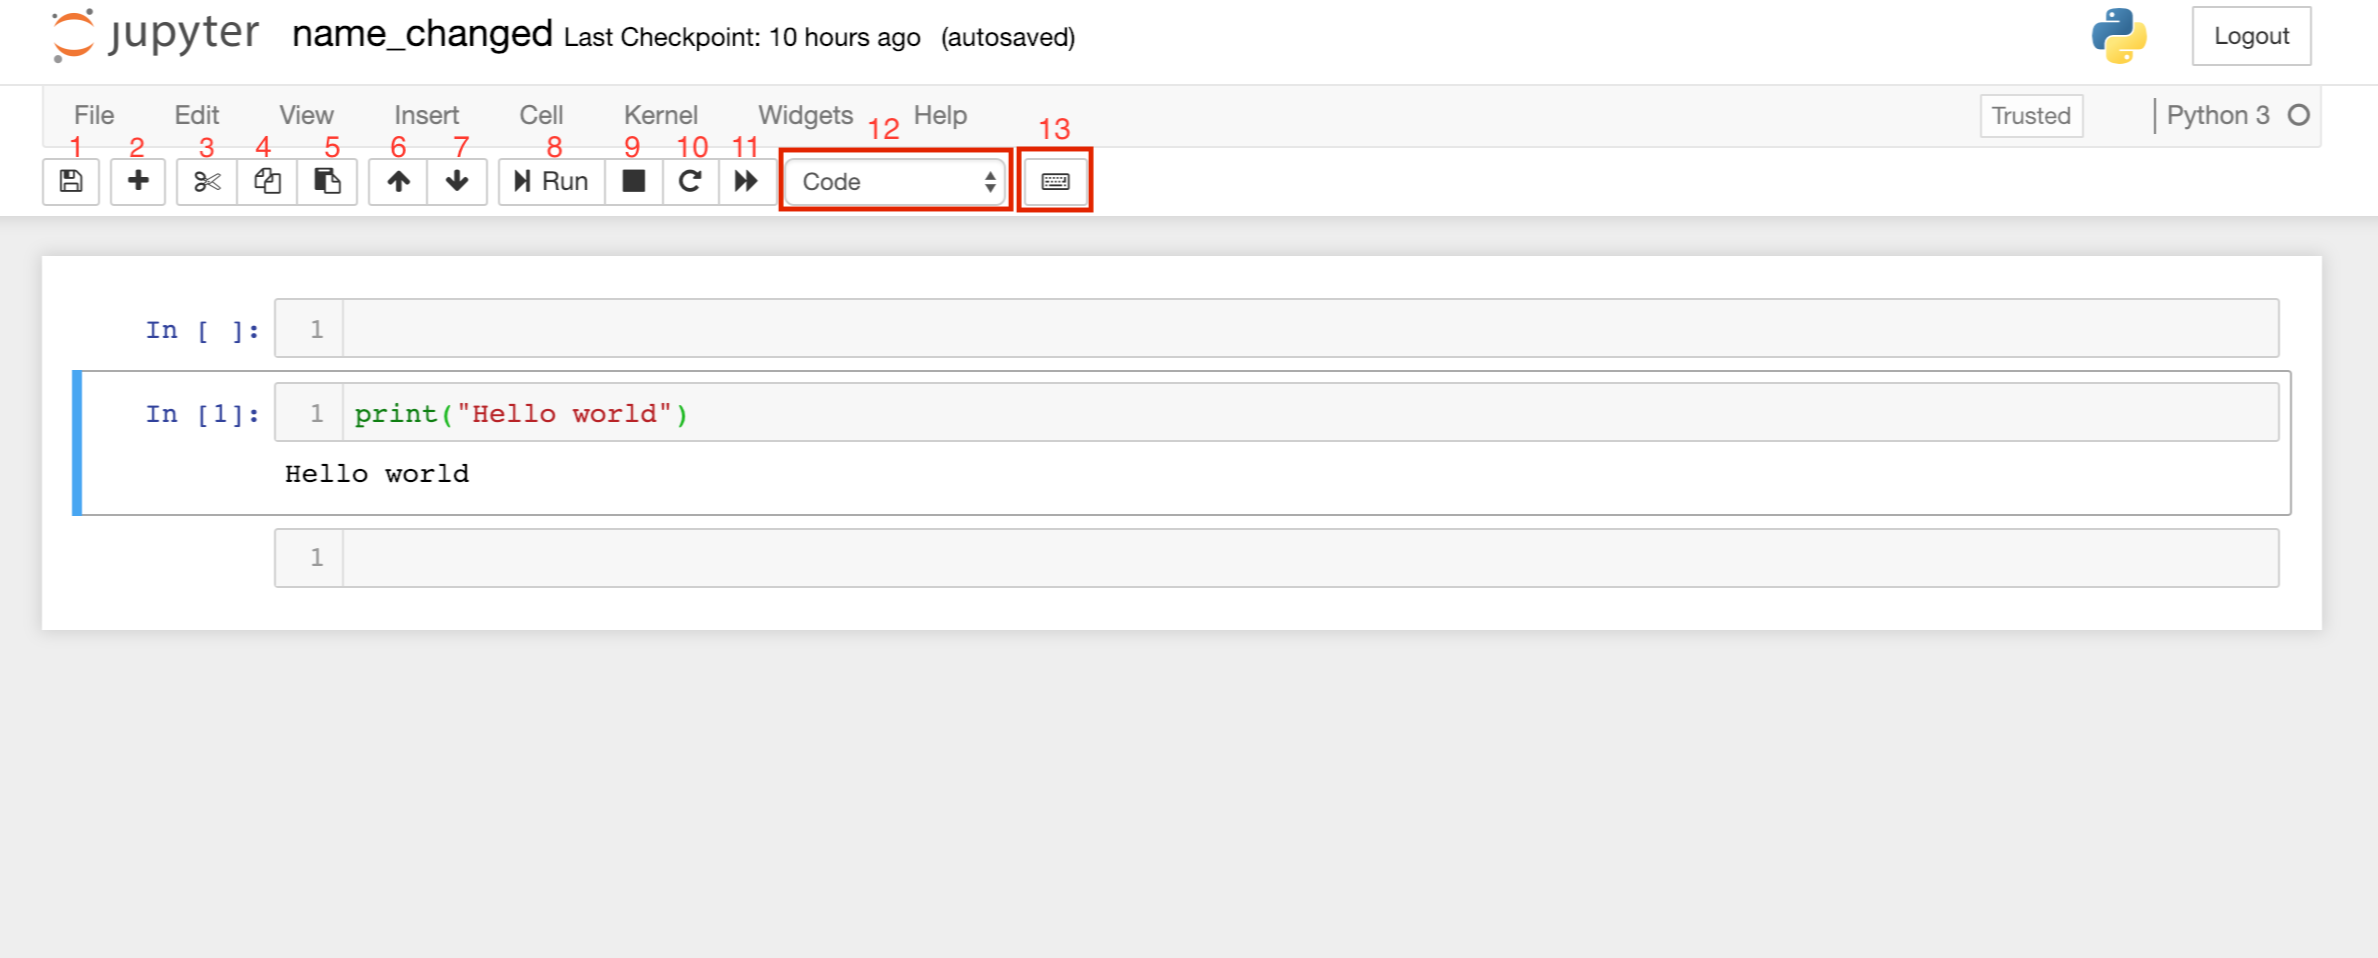
- To save the file
- To create a new cell
- To cut the content of a cell
- To copy the content of a cell
- To duplicate a cell
- To move the cell up
- To move the cell down
- To run the cell
- To stop the kernel
- To restart the kernel
- To restart the kernel & re-run the notebook
- To change the cell option (code, markdown, etc.)
- To open the command palette
Cell execution
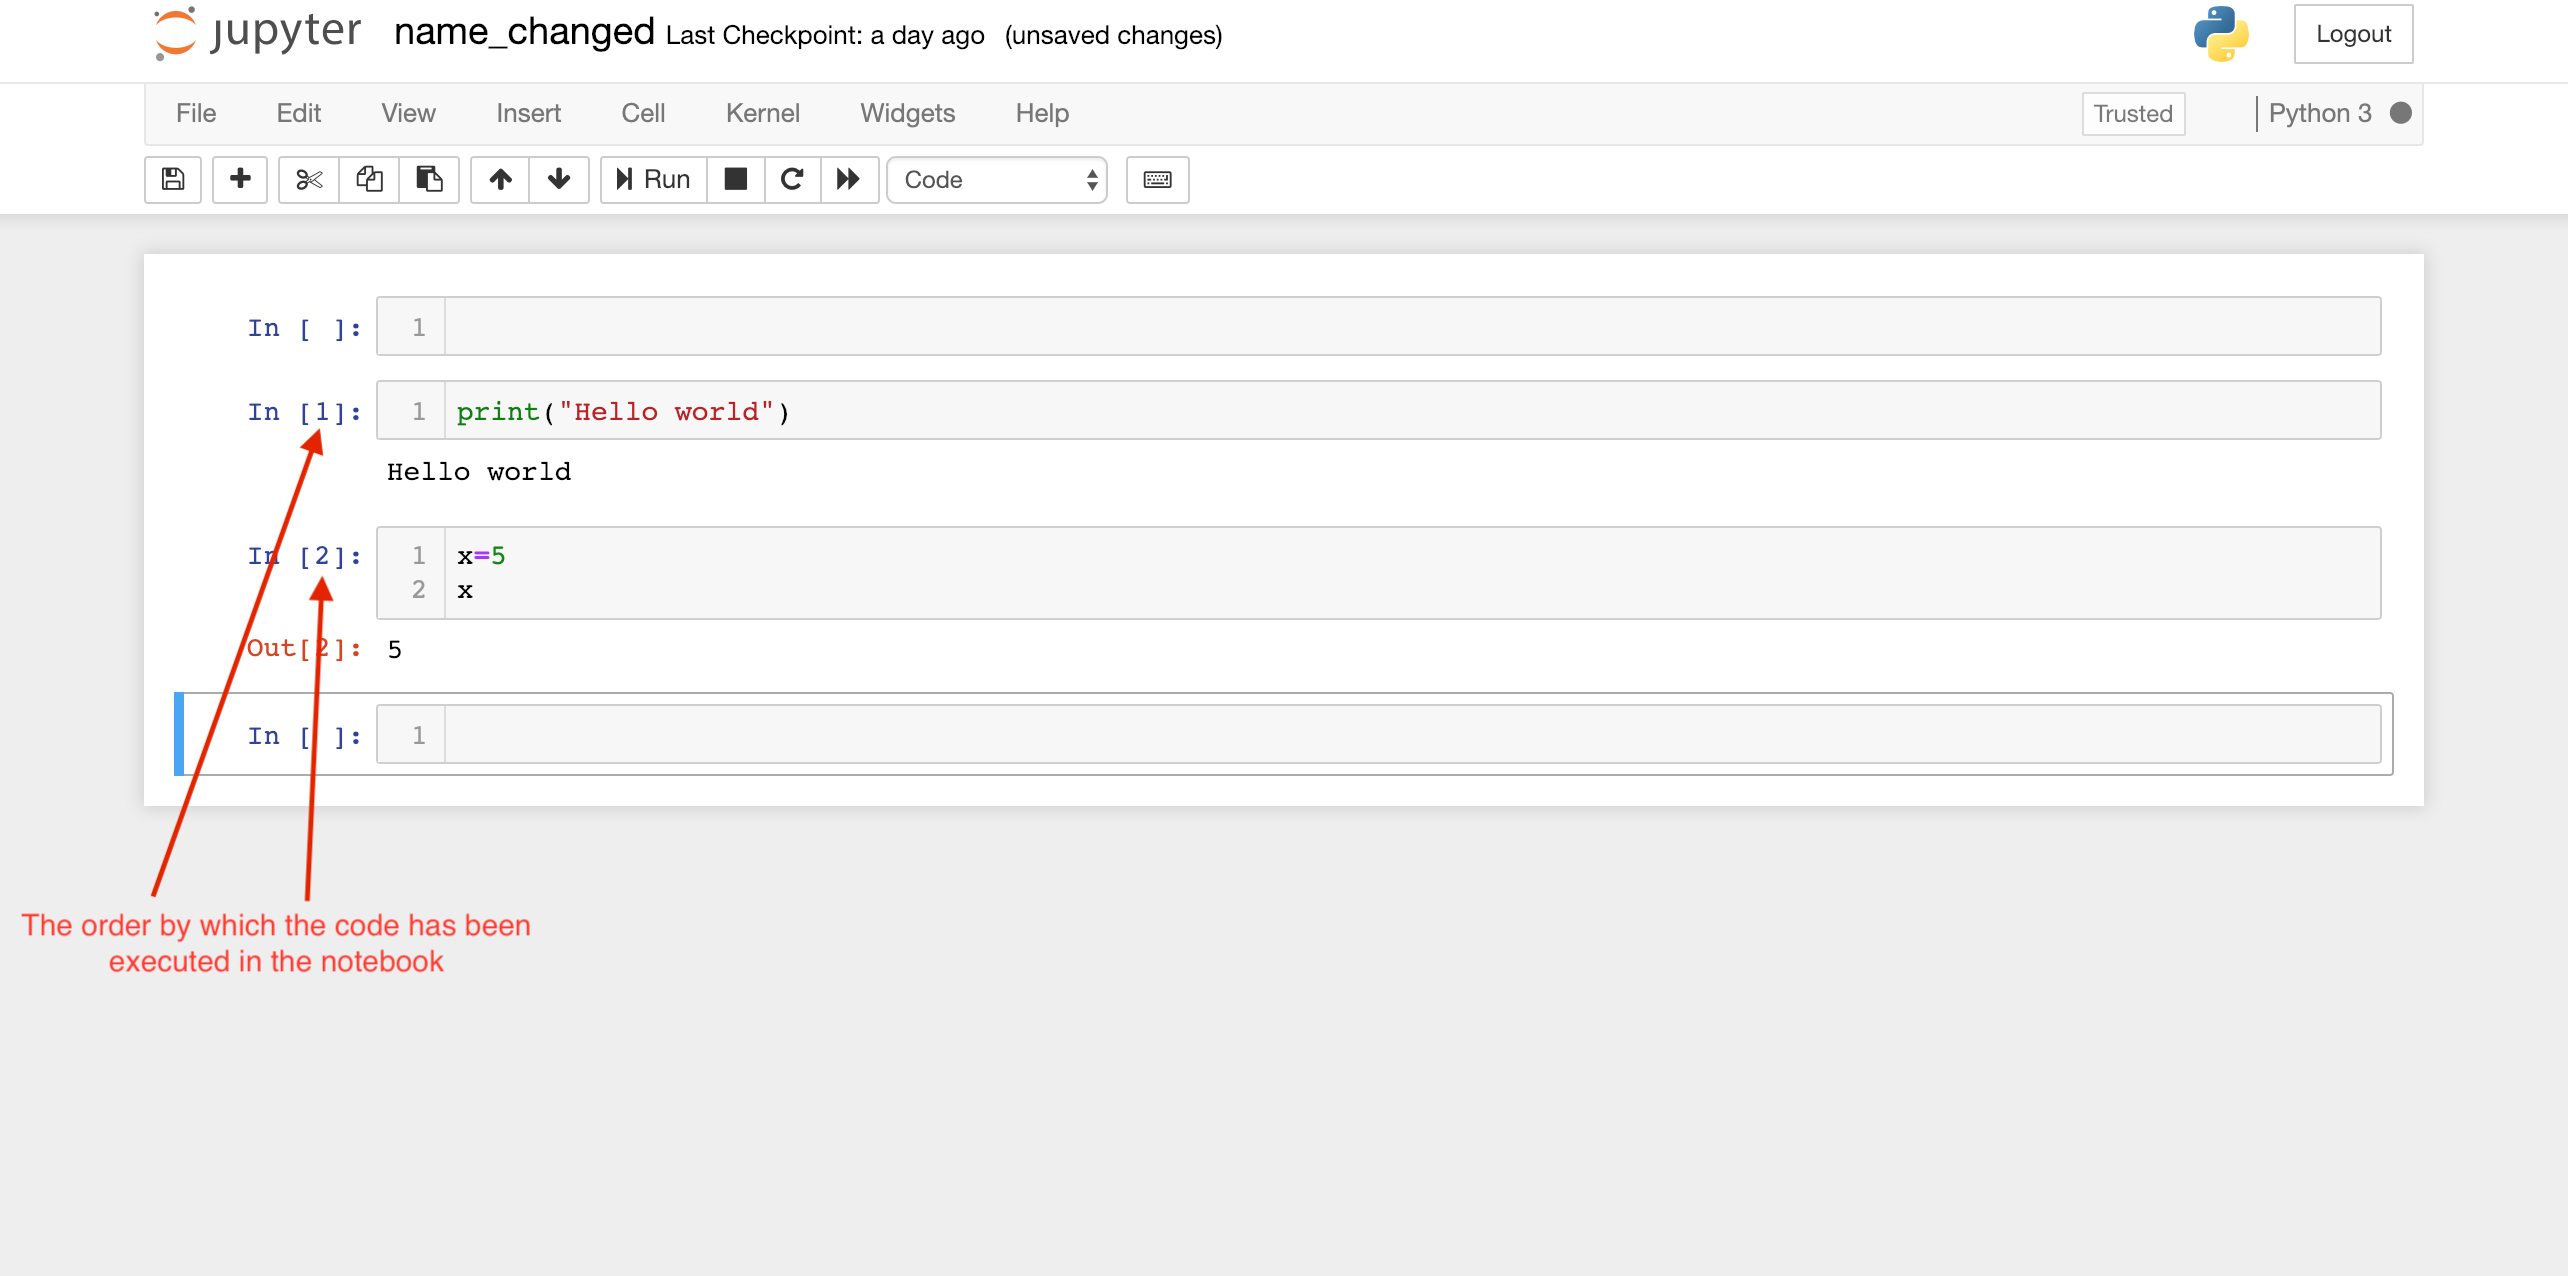
We also have to pay attention to the numbers found at the left of the cell, these numbers represent the order by which the code has been executed since the code in the notebook doesn’t have to be arranged in chronologically.
When the kernel is busy, you won’t be able to execute any other cell in the notebook.
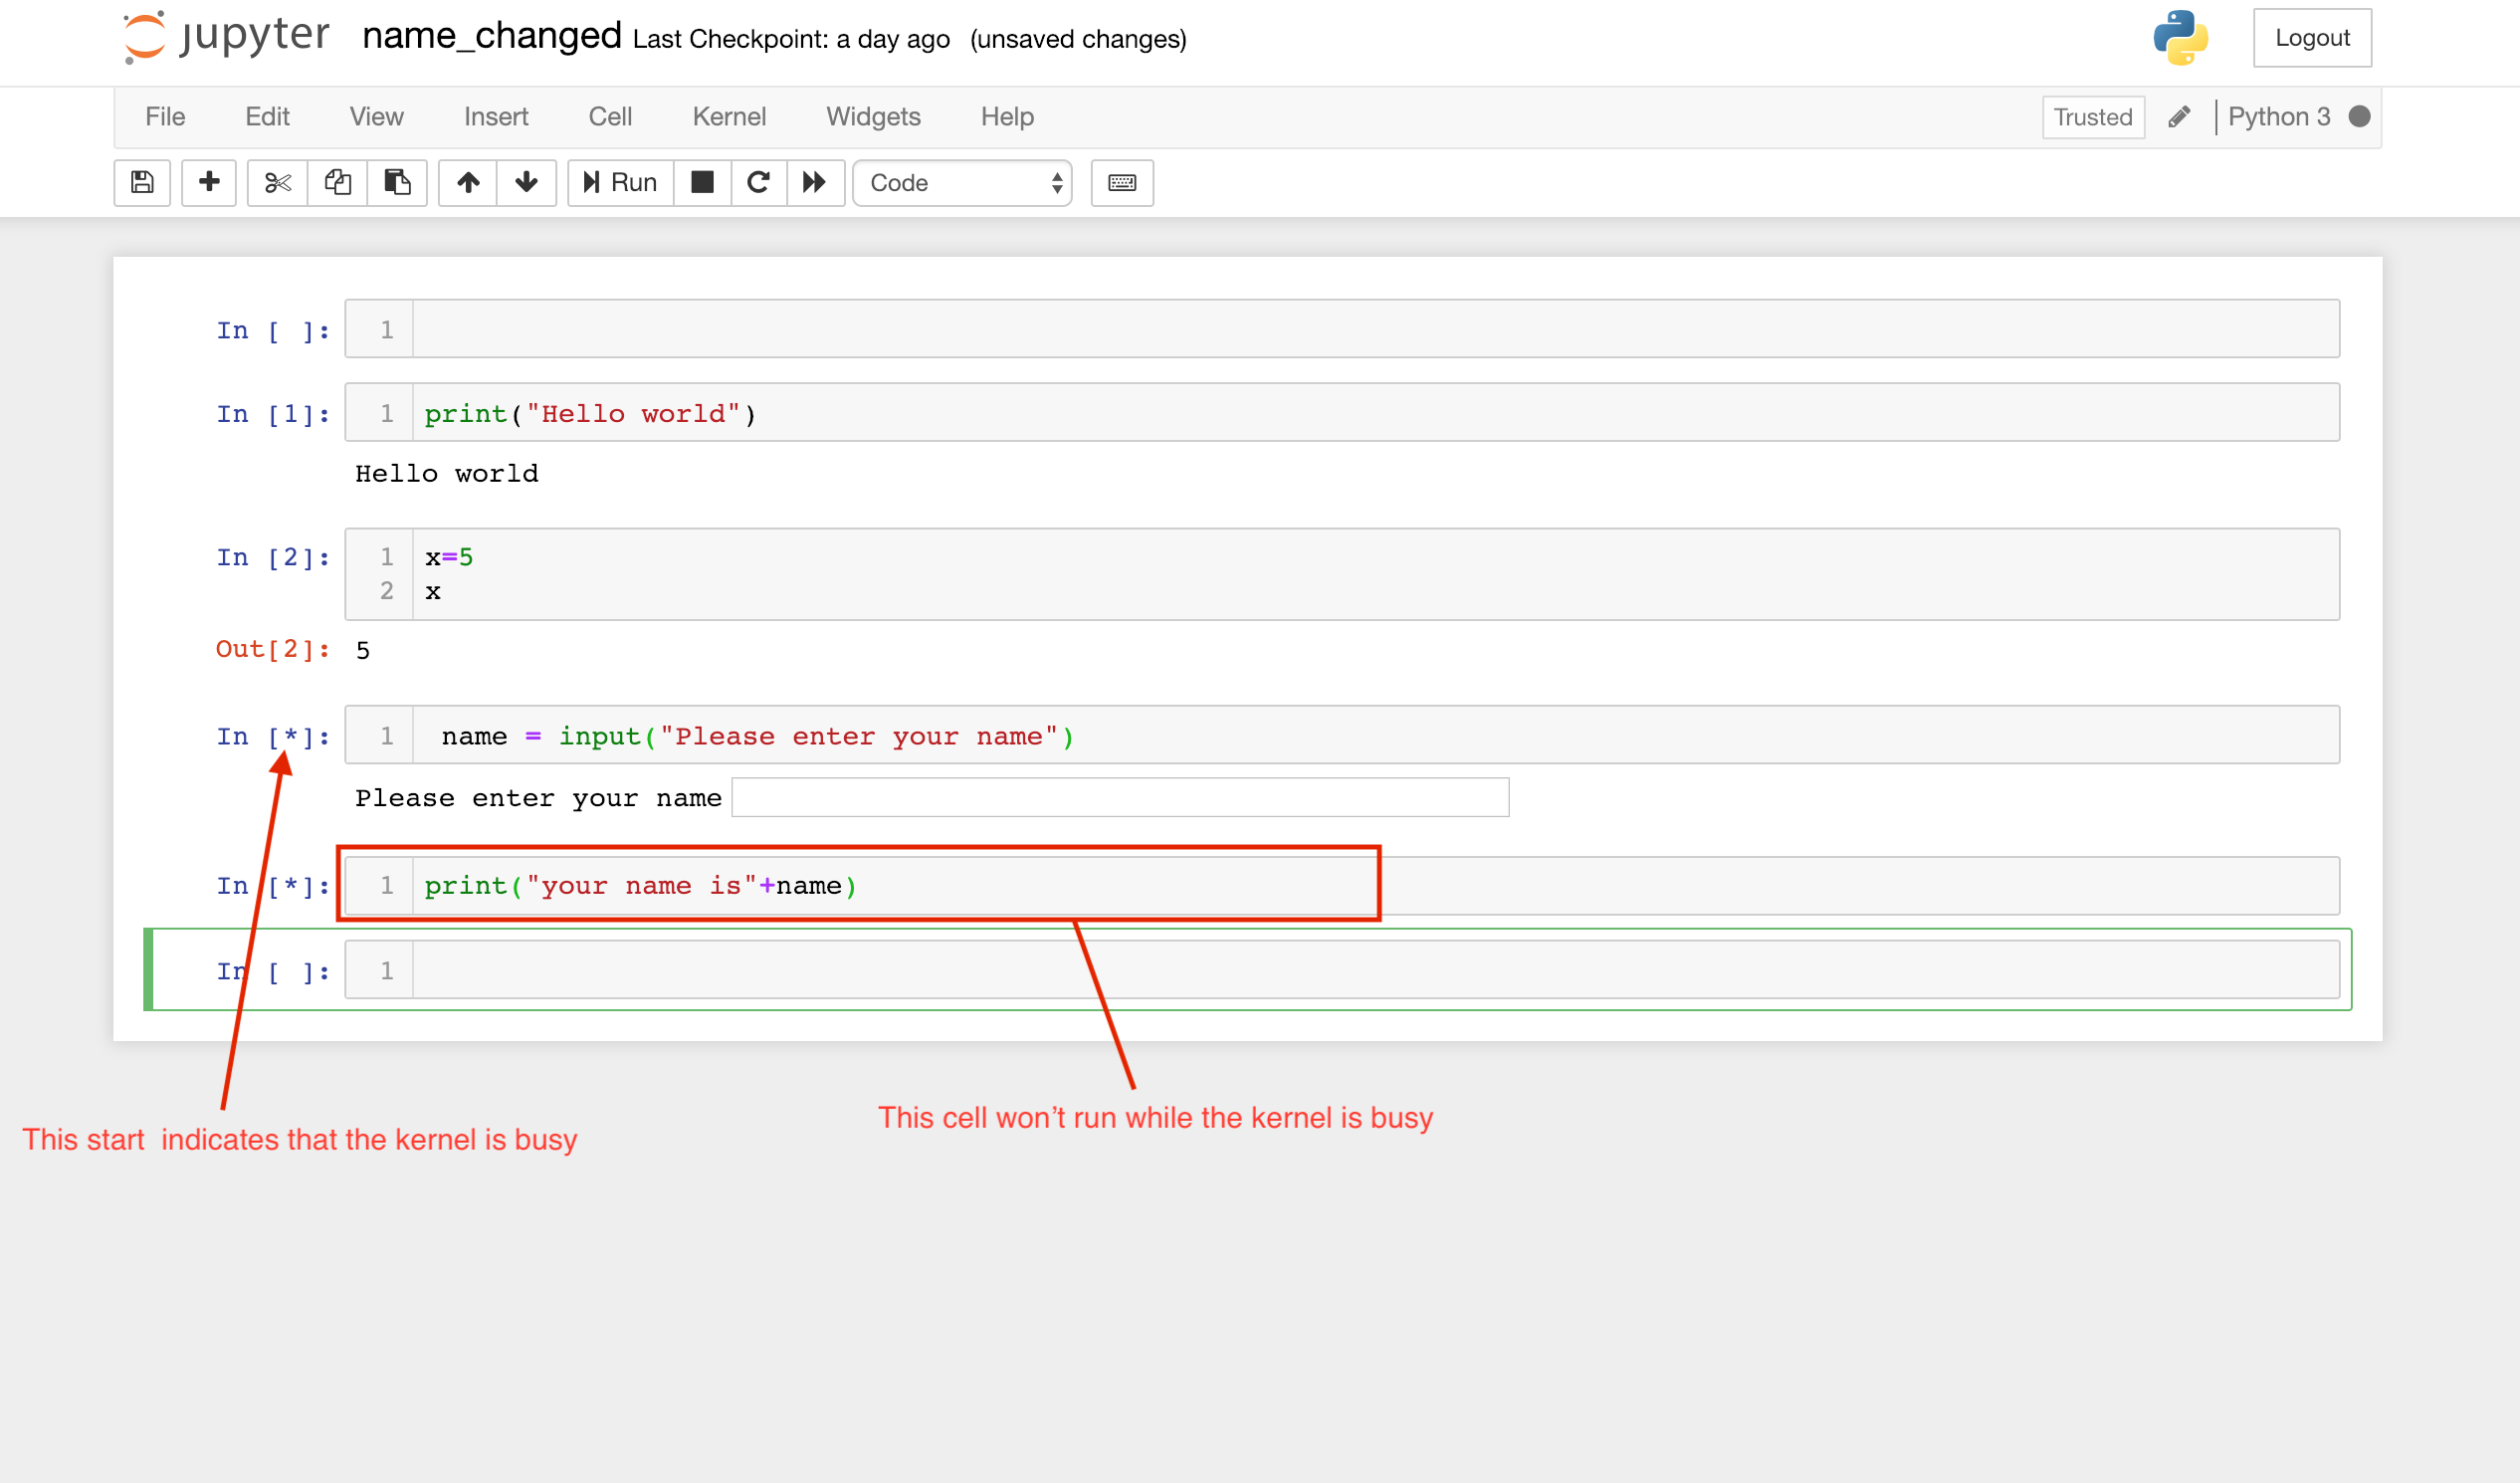
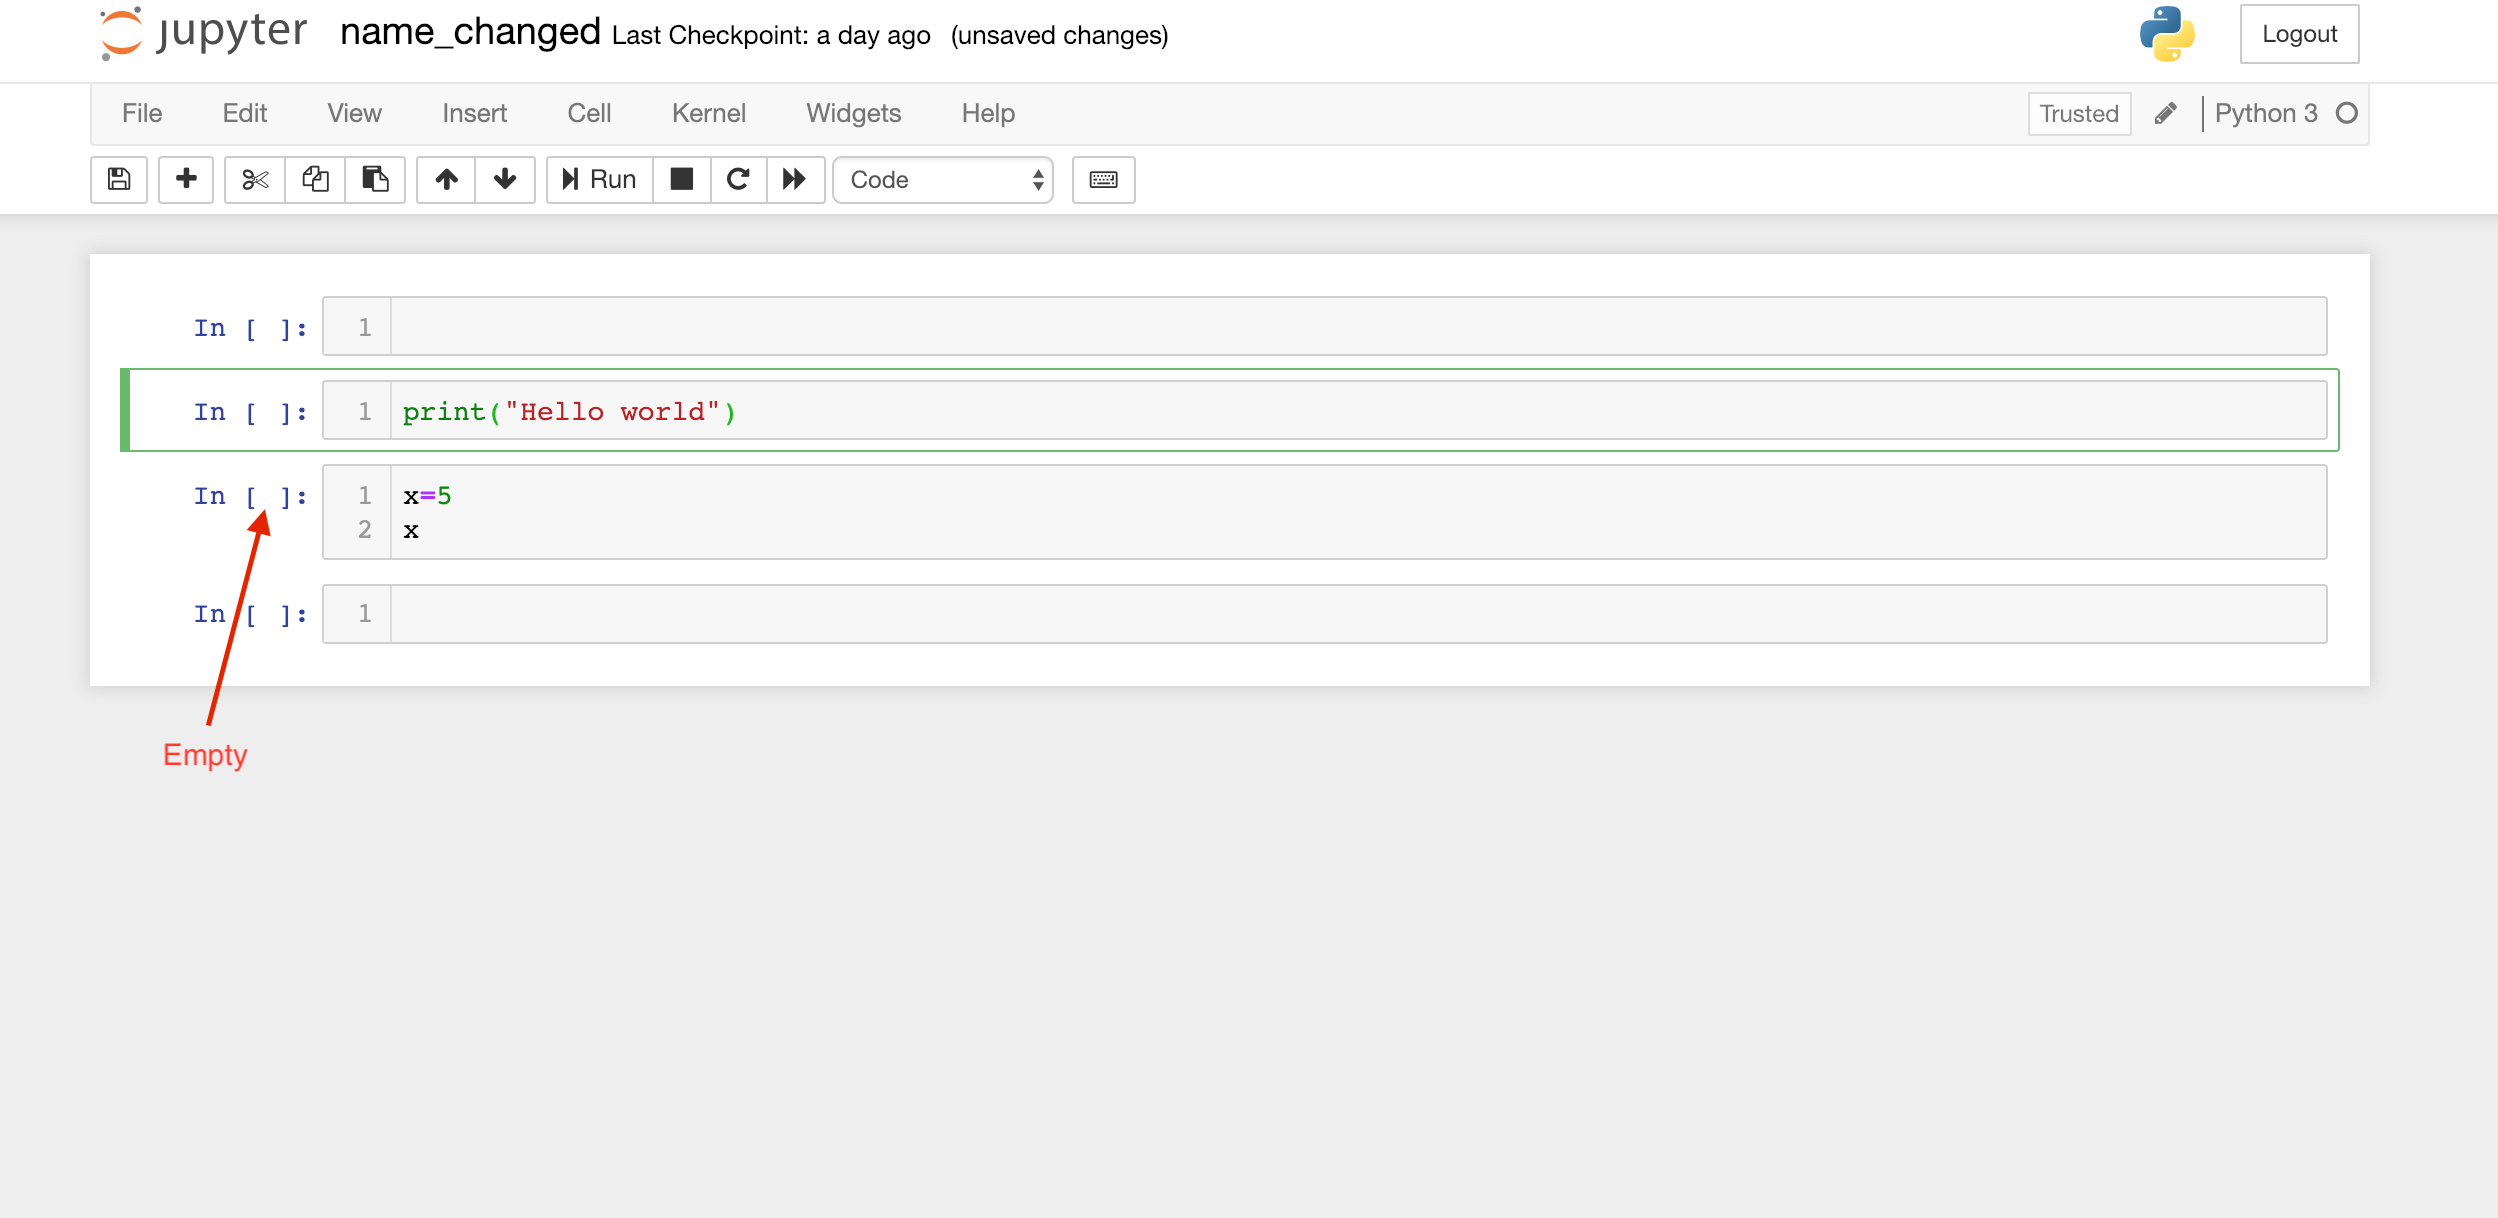
So when you can’t run a cell, restart the kernel. If you restart and clear output, all the number will disappear, meaning that none of the code has run yet.
Add markdown to the cell
Jupyter has a great feature to add markdown to our code. Markdown can be used, for example, to give an explanation or visualization to the code written in the cells.
To change the cell to markdown, you press the drop-down menu and select markdown.
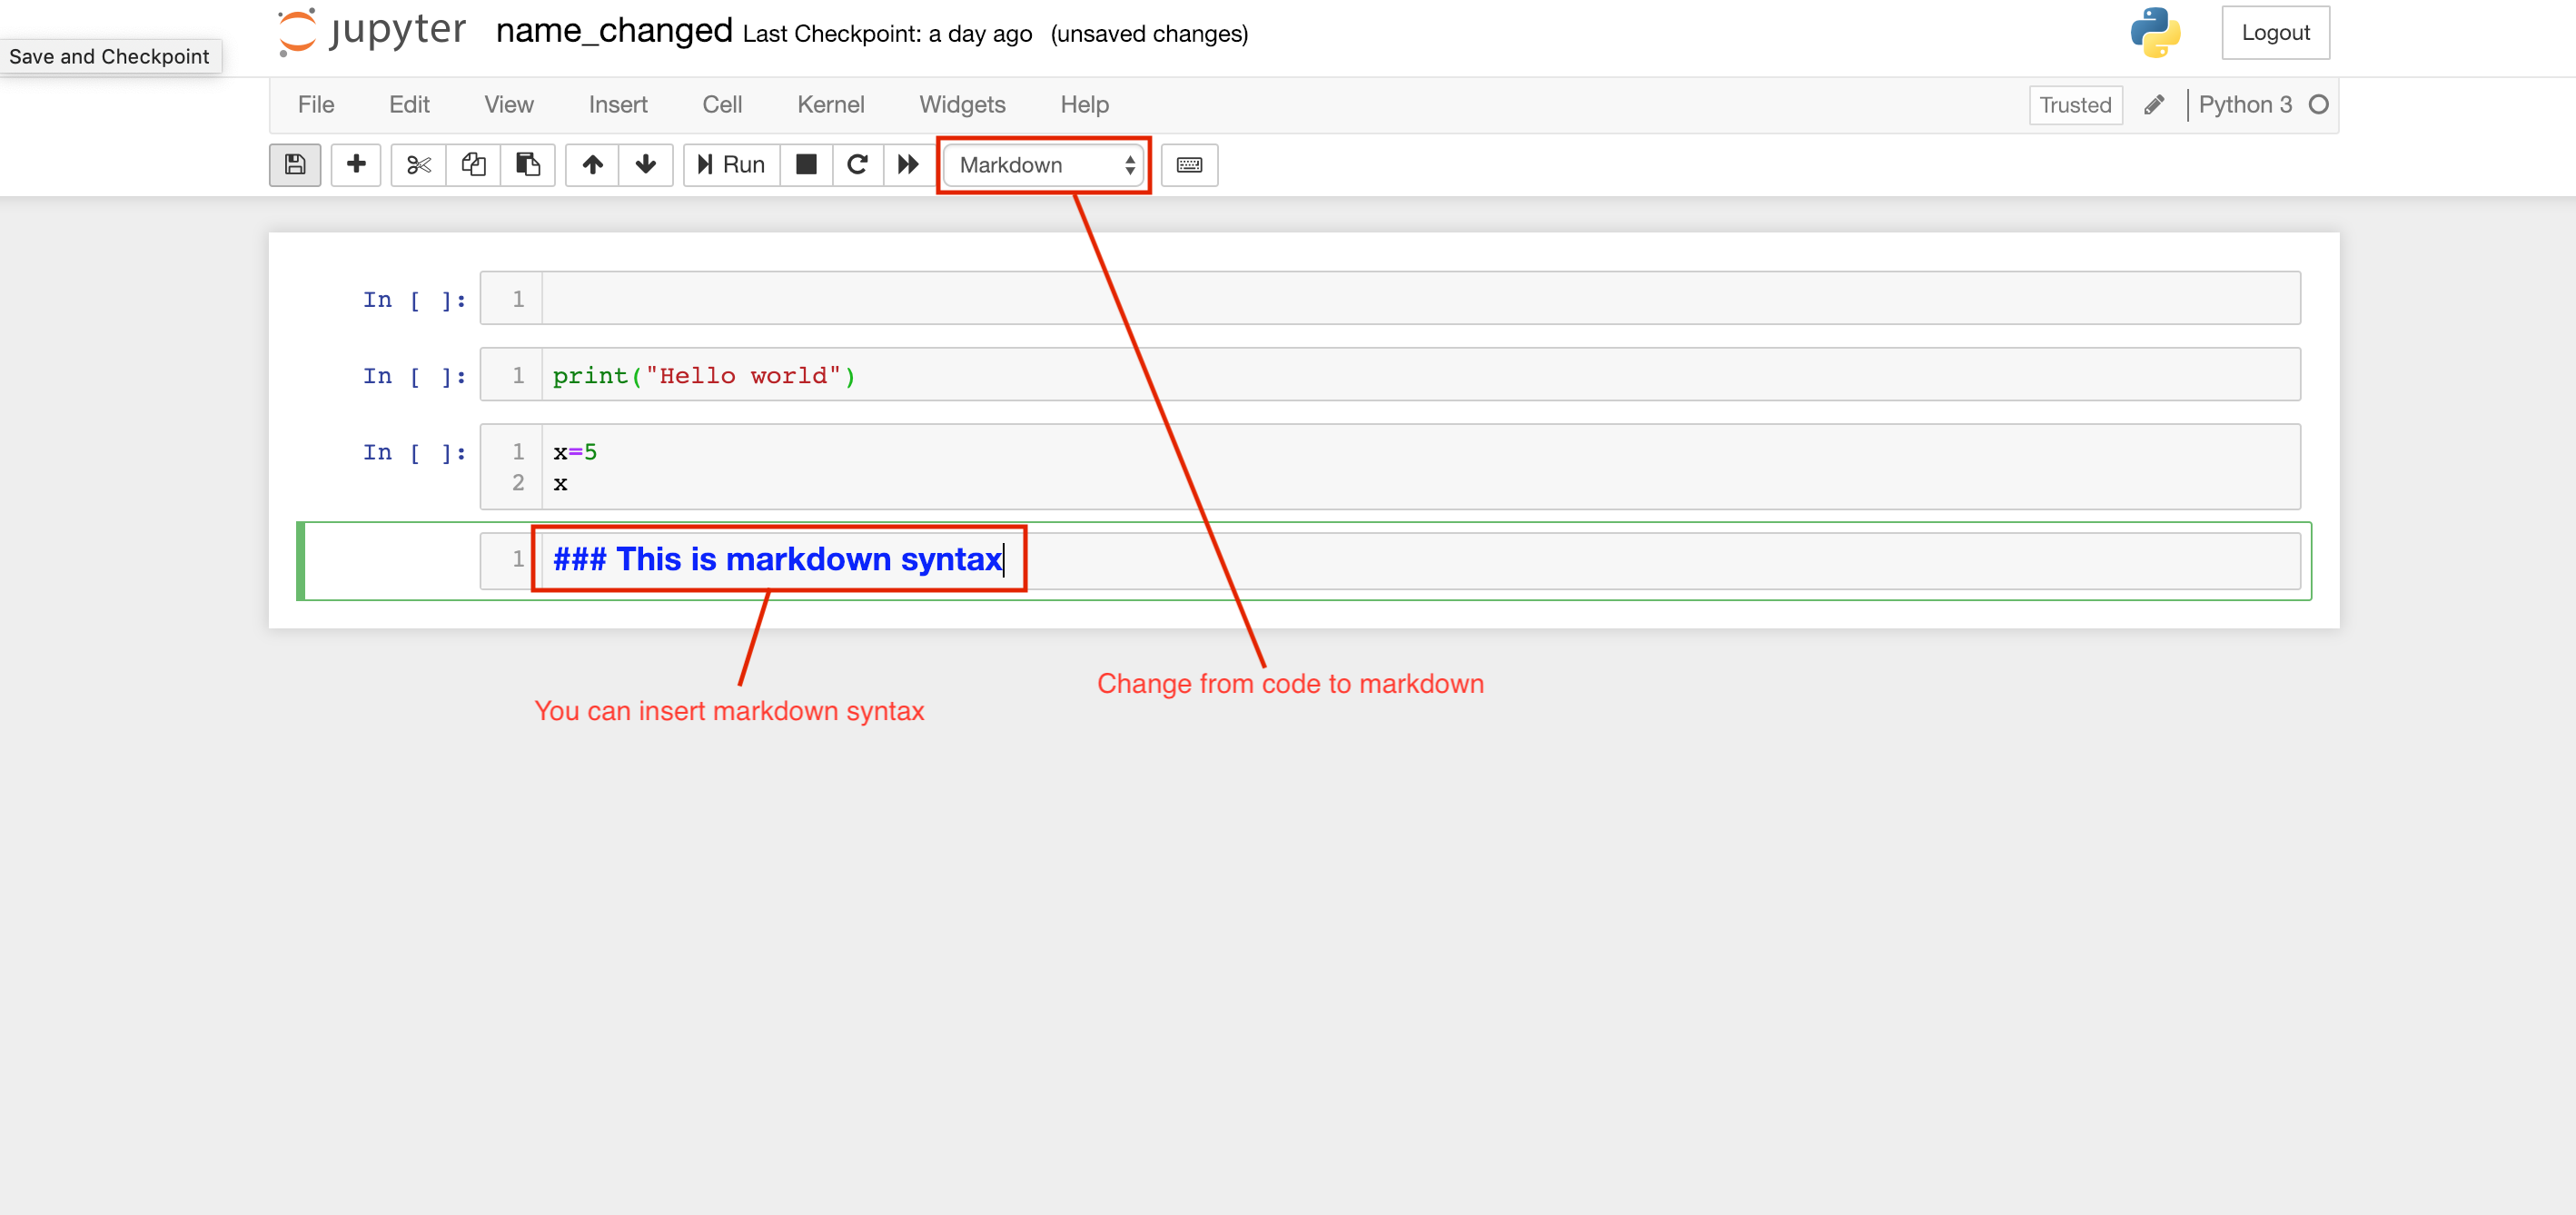
You can insert images and text using markdown and then hit ENTER to display the markdown. There is an excellent guide on markdown here.
Magic commands
Jupyter has special commands called magic command. These commands are unique for jupyter notebooks and are of two types:
- line magics (start with ! or %)
- cell magics (begin with %%)
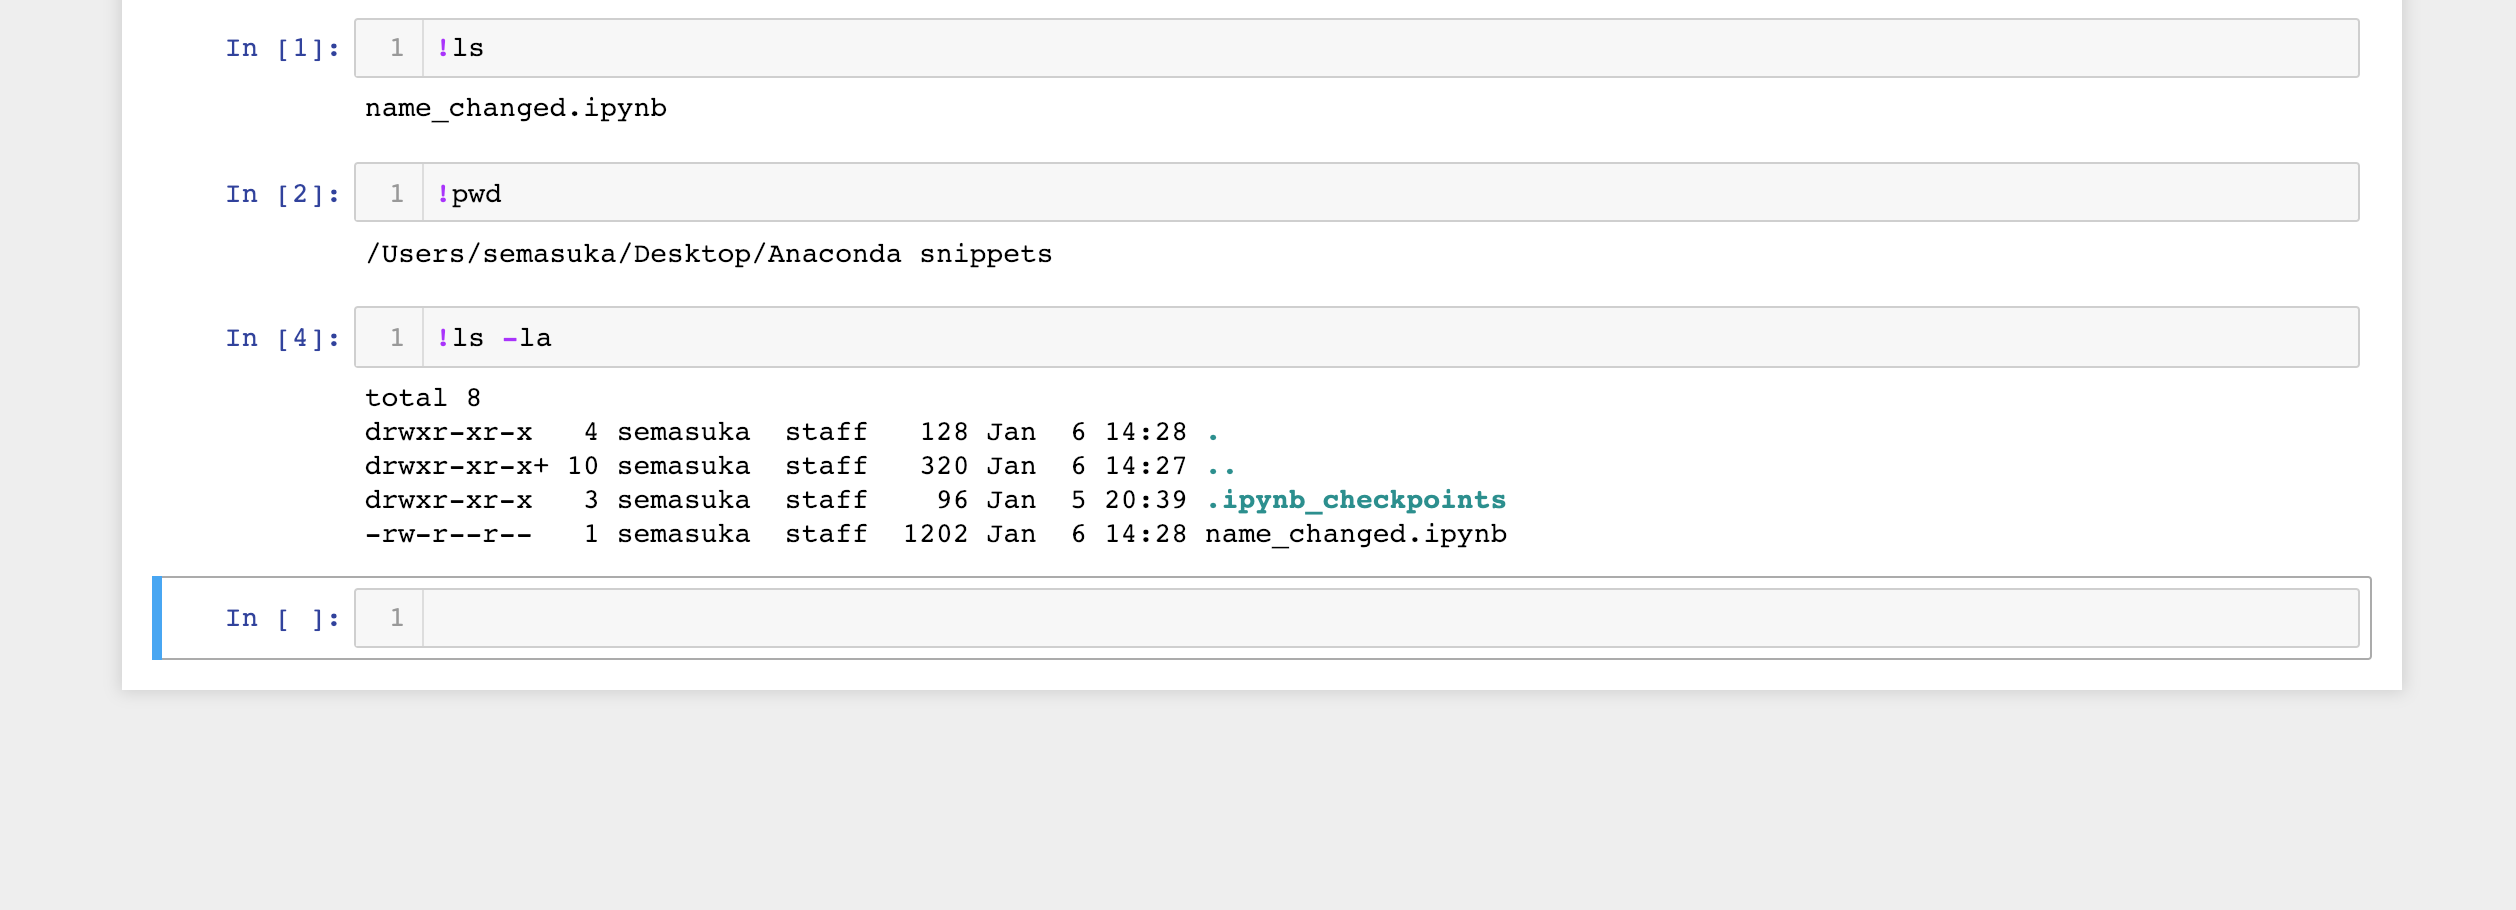
Line magic command starts with ! or %, all the code on that line after the ! or % character will be interpreted as bash command. So can easily do all the commands you would have to type in the terminal, straight in your Jupyter. Cool hein?
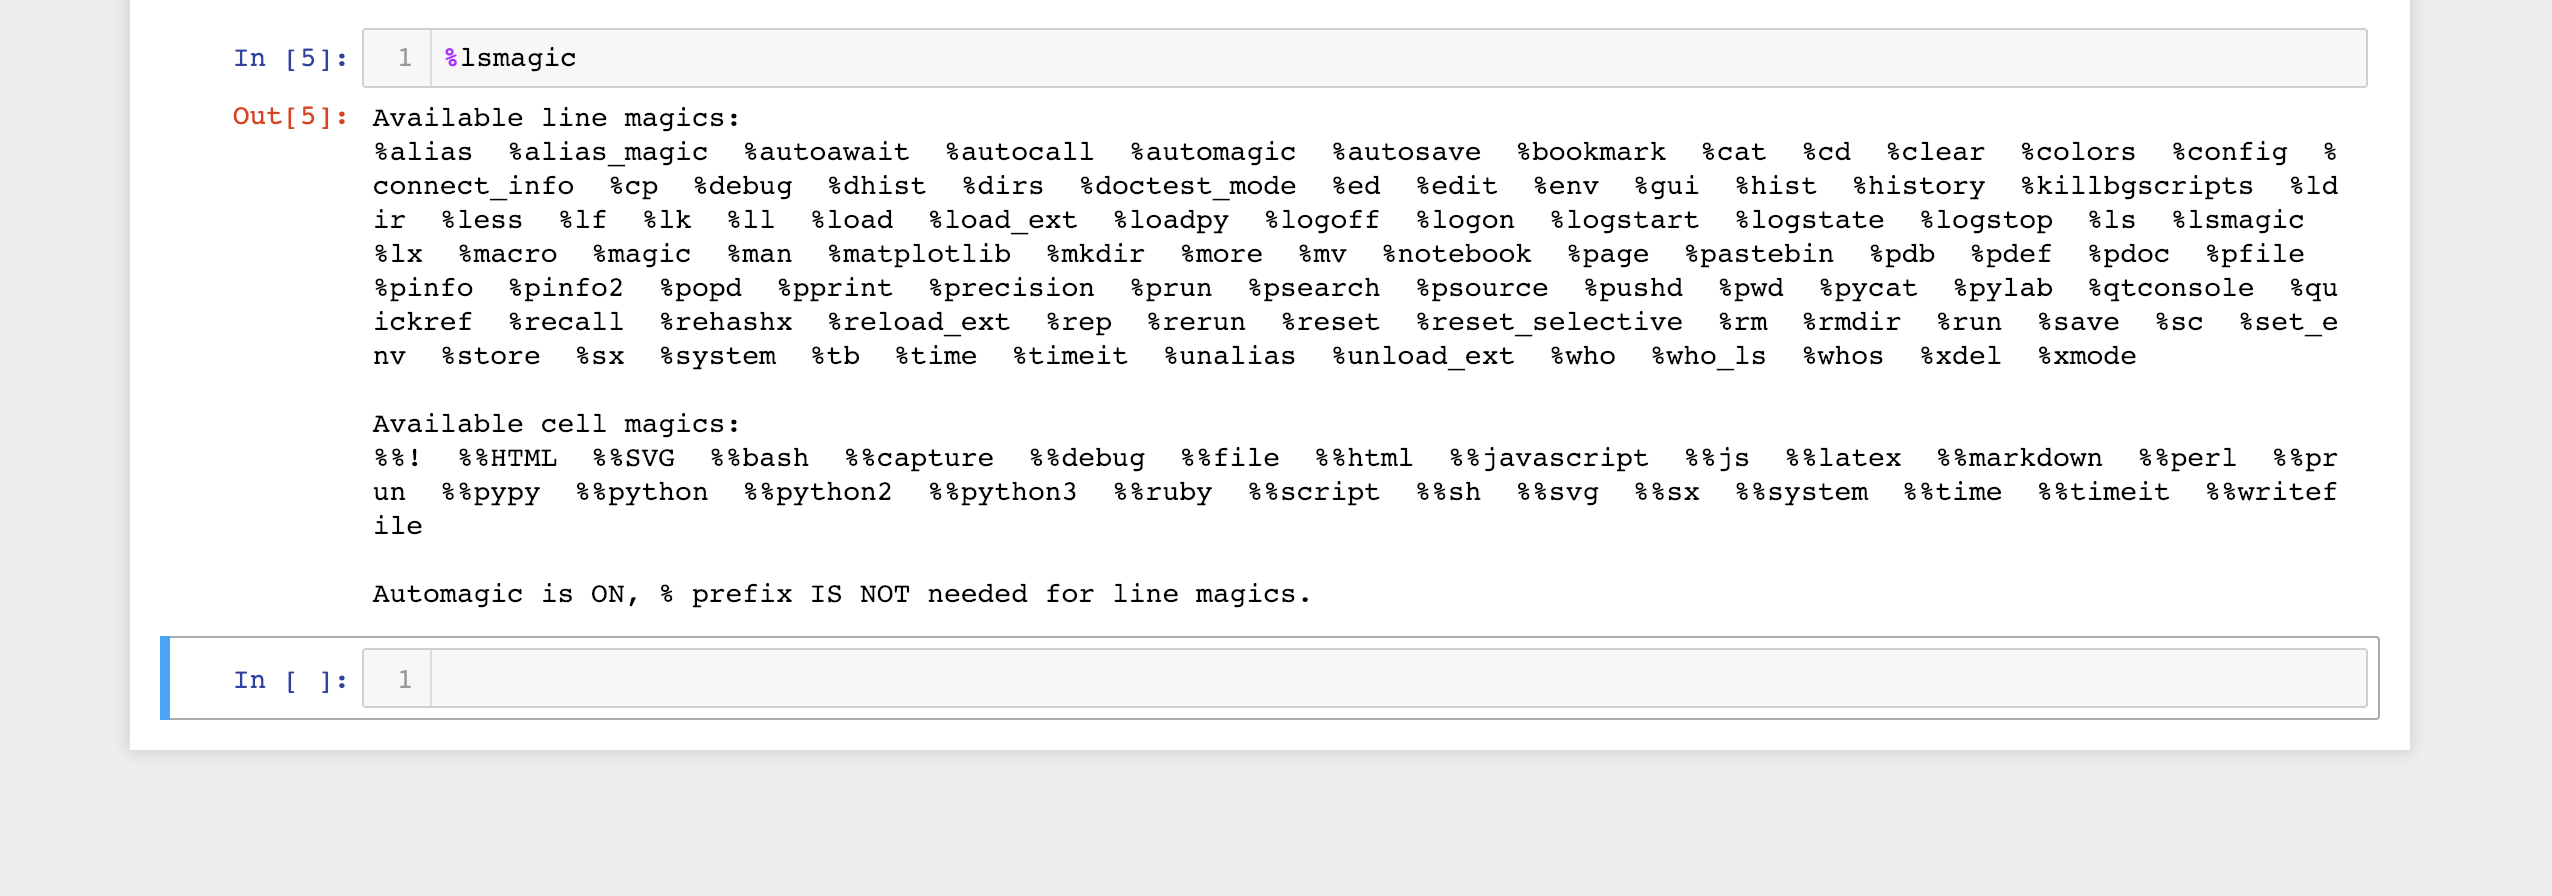
Another magic command is %%, which mean that all the lines of code in the cell will be rendered as magic. We can list all the magic commands of Jupyter by running %lsmagic in the cell as follow
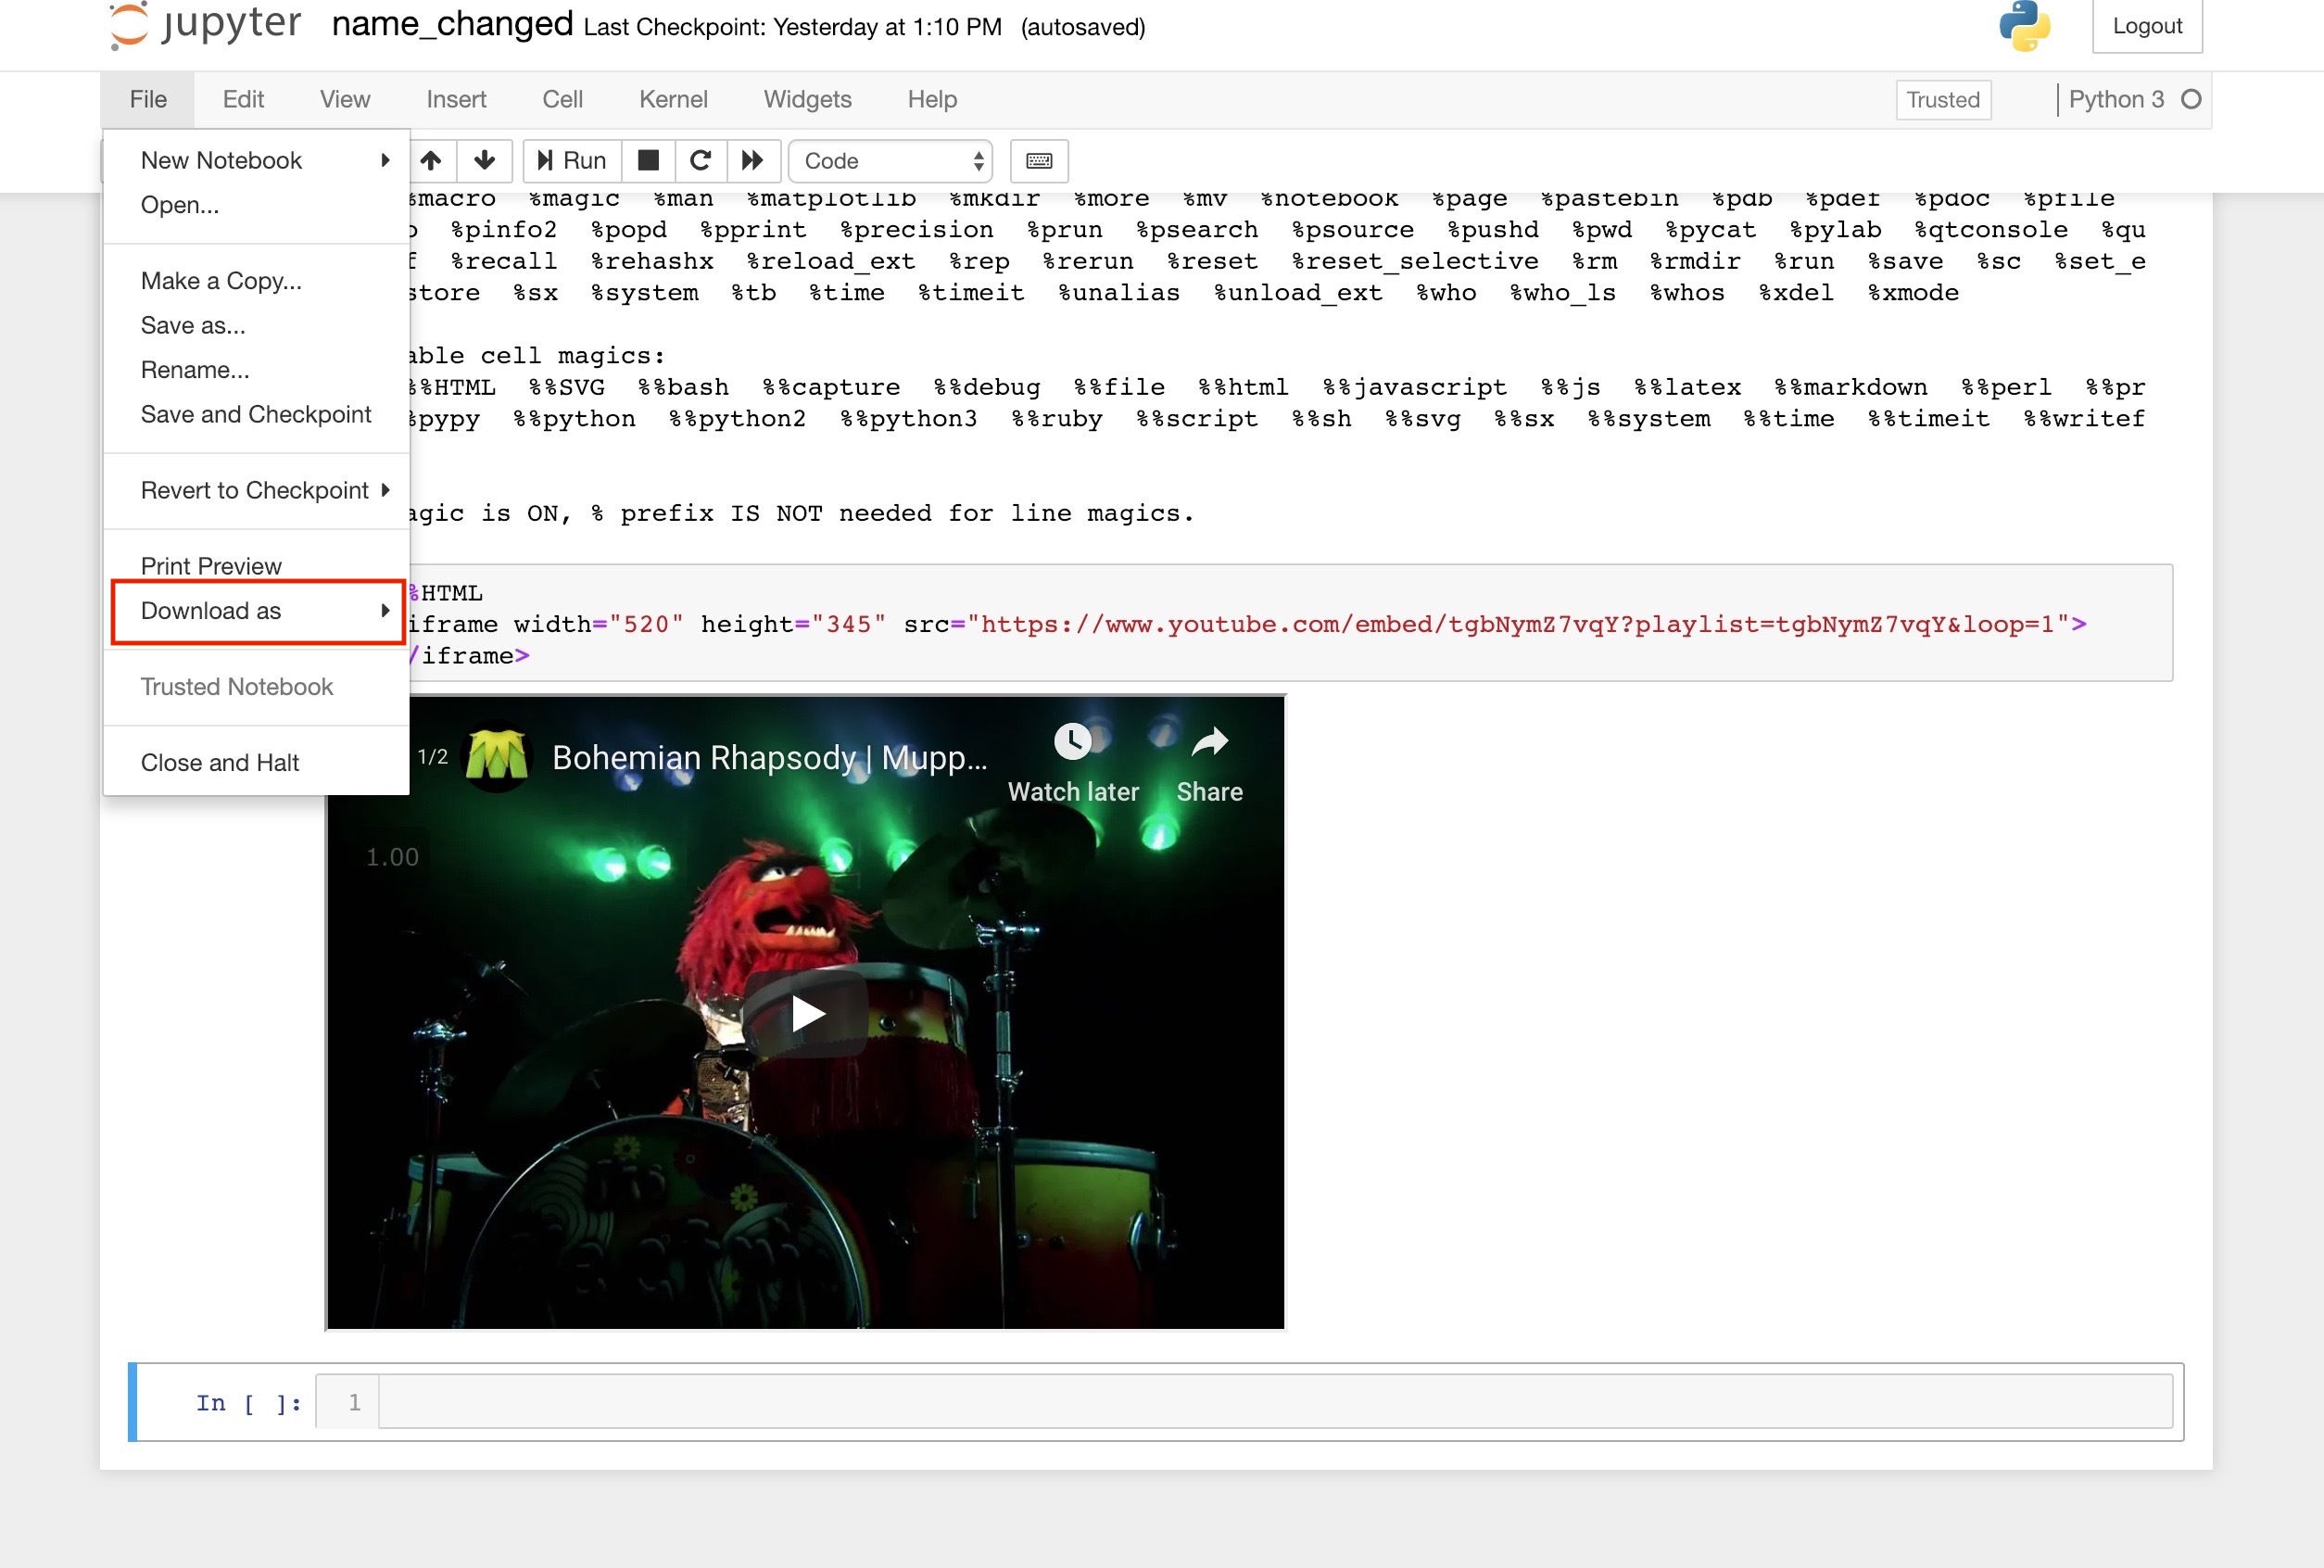
Let’s use the %%HTML, which means that all the code in the cell will be rendered as HTML. We will use the iframe tag to display a video from YouTube.
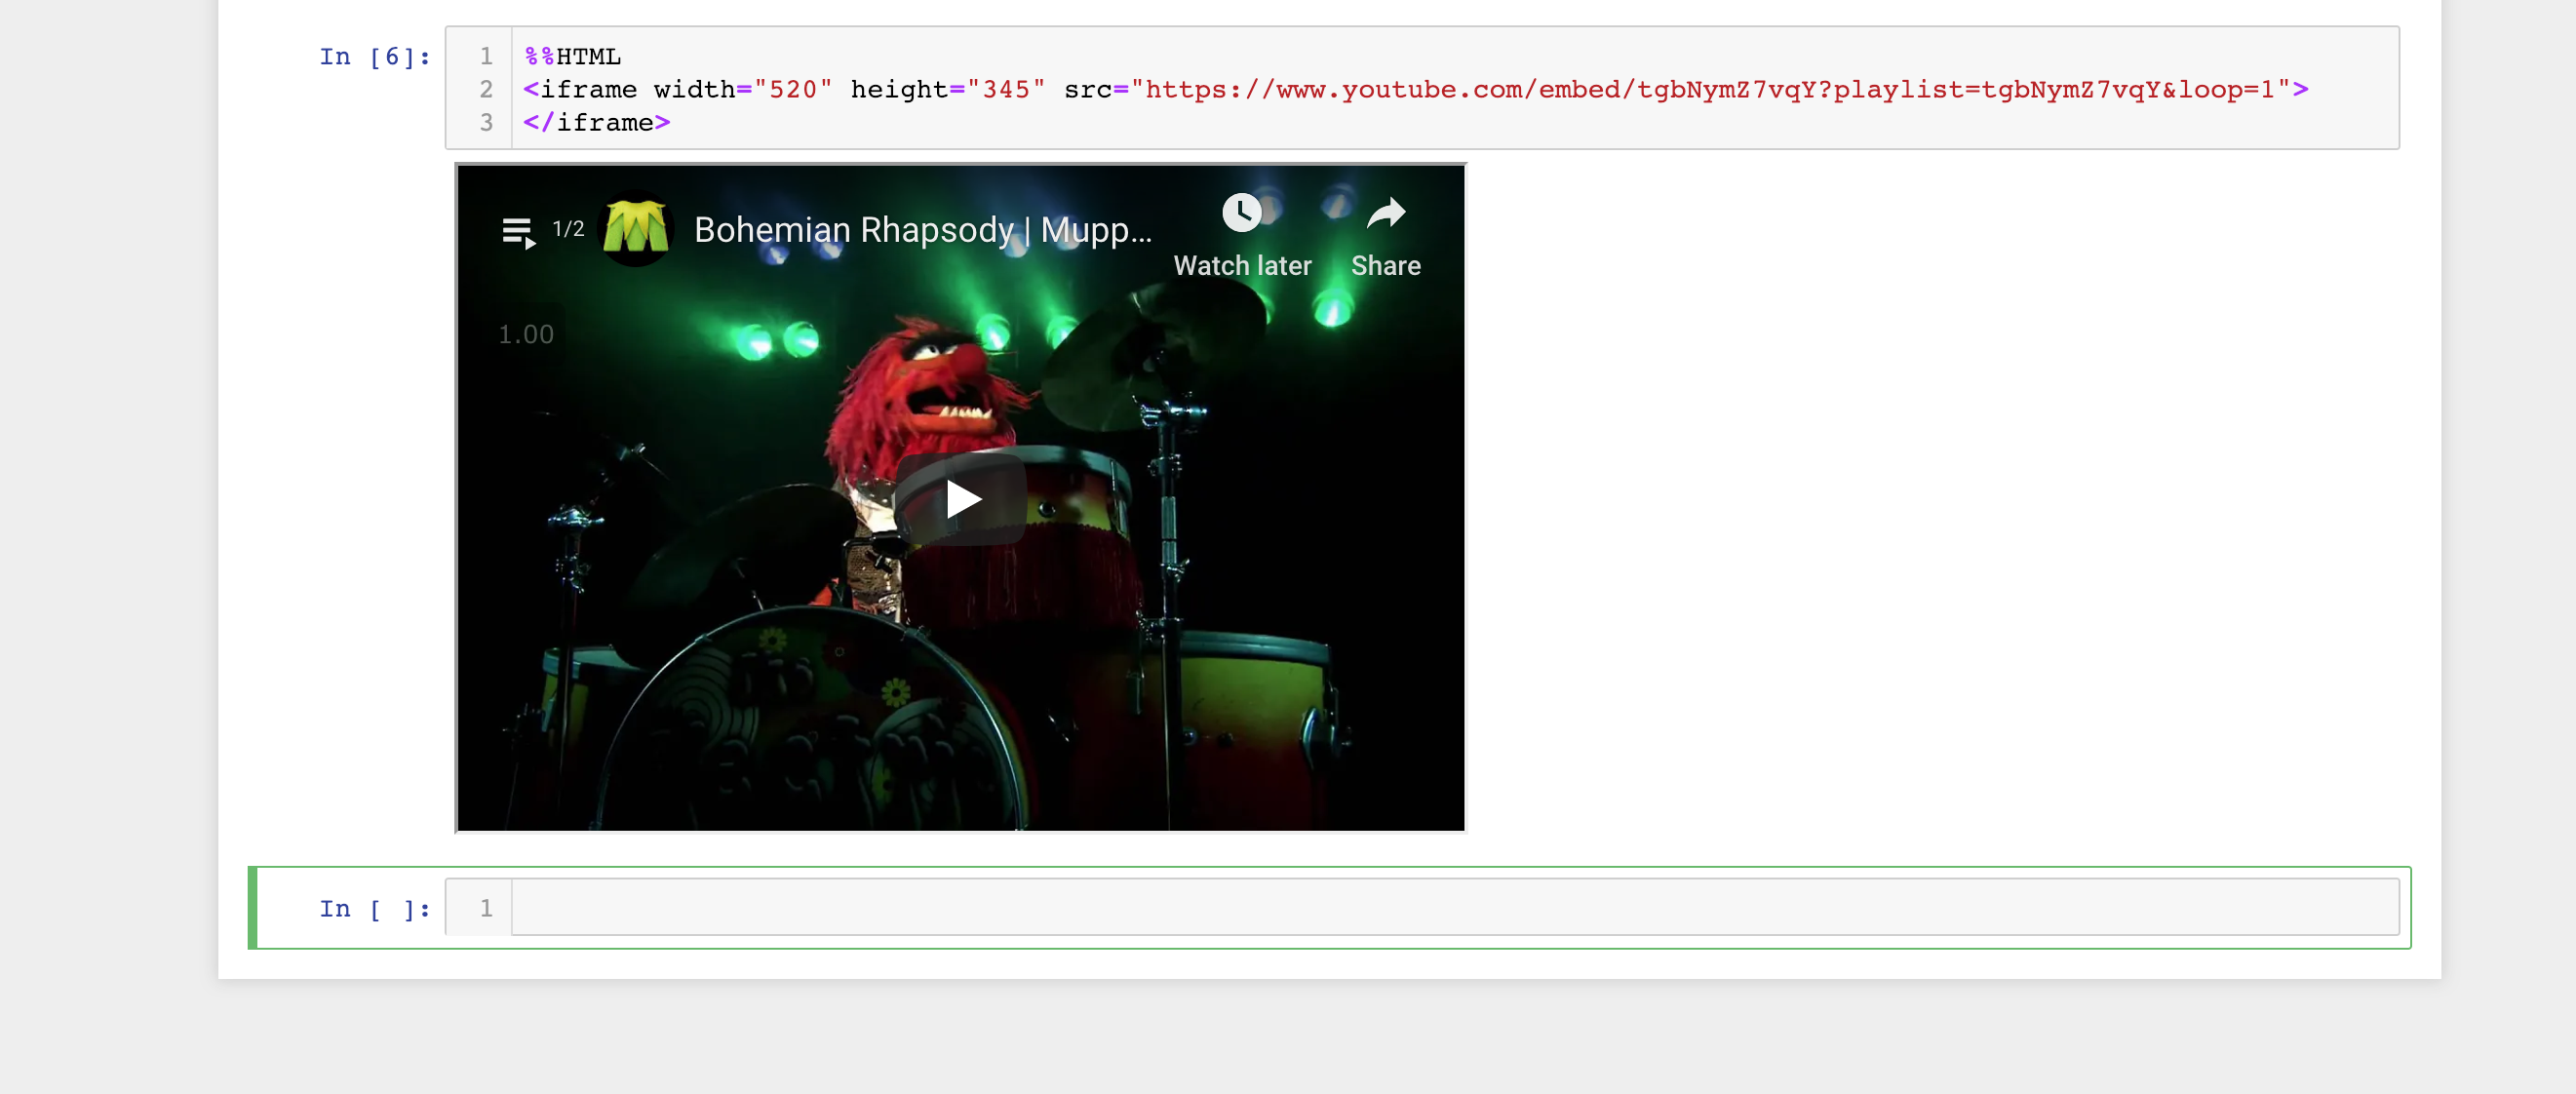
as we can see, we can use jupyter to write multi-line codes of HTML, JavaScript, LaTex, Perl, and even, which makes Jupyter an all-in-one tool.
There is one handy command that I use quite often, and it is the %%timeit command that calculates how long a script takes to complete.
Export
you can export the .ipynb into different file format ranging from python, HTML, markdown, LaTex or pdf by pressing the file button in the menu bar and download as.
I will be writing all my tutorial post in Jupyter notebook and export it as a markdown file.
To sum up
Jupyter notebook is a pretty useful tool, especially if you are a researcher who writes codes that need to be explained deeply. Yes, you can use a standard text editor with comments, but you can’t compare comments and markdown. Plus all the features that Jupyter has to offer I would say that it is hands down the go-to “text editor” for Machine Learning in 2019. I will be using Jupyter notebook to write code in Python on this blog. One downside of jupyter I can think of would be its lack of code auto-suggestion.
I hope now you have a basic understanding of how Jupyter works, and it’s main features. If you want to learn more, you can read the full documentation here.
Thank you for reading this tutorial. I hope you have learned one or two things. If you like this post, please subscribe to stay updated with new posts, and if you have a thought or a question, I would love to hear it by commenting below. Remember keep learning!